
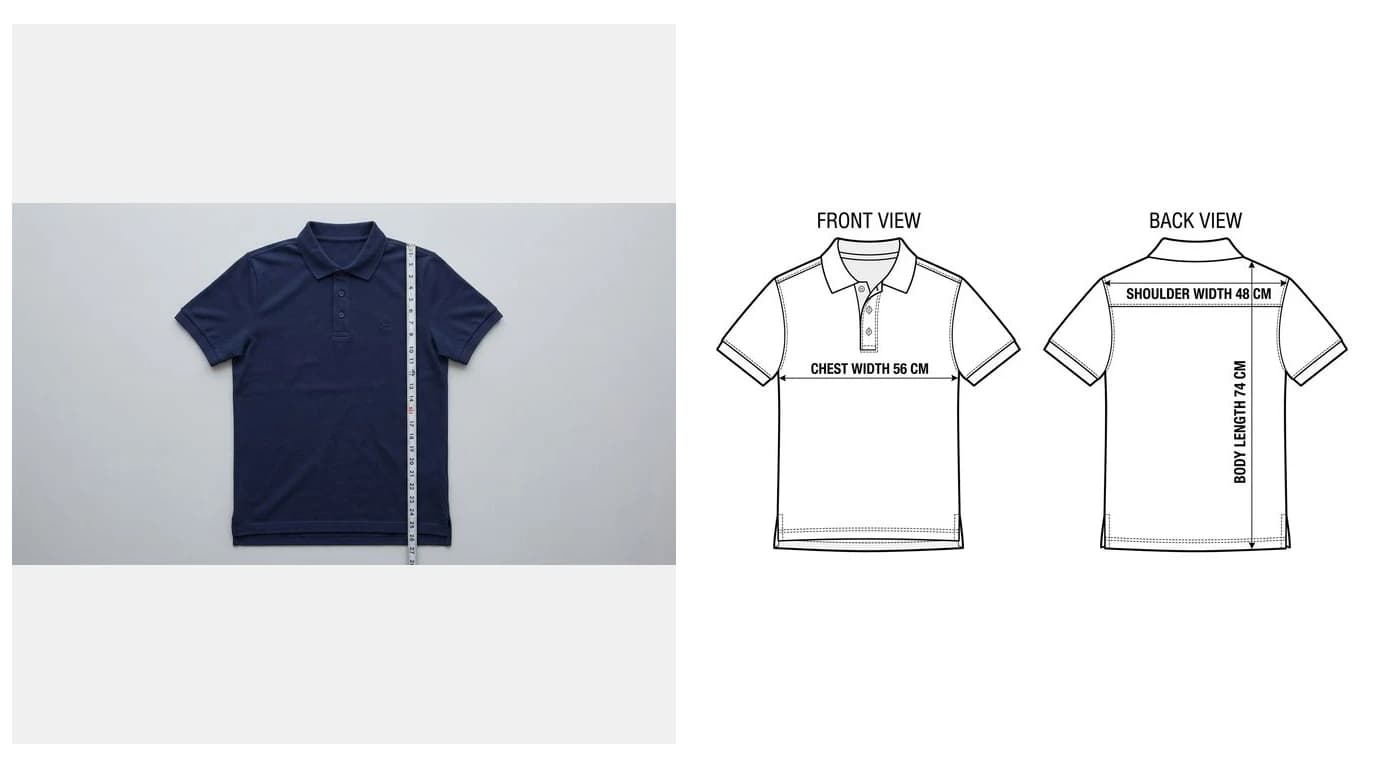
A fit sample comes back and it is wrong. Not wildly wrong, just wrong enough: the body is fine, the sleeve is short, the hem is tight. You go back to the spec sheet and the number you wrote is the number they made. What went wrong was not the sewing, it was that you and the factory measured the same garment in two different places. This is how to write measurements that cannot be read two ways.
Our articles are still written by humans!
Get human written articles in your Google feed.
The short answer
Lay the garment flat on a hard table with no tension and close whatever closes. Measure the garment, not a body, which means every width is half the circumference. Take each reading at a stated location, not at a vague one: chest 2.5 cm below the armhole, body length from the high point of the shoulder, hip a stated distance below the waistband. Put a tolerance on every line, open the widths up on knits, and write the base size, the units and whether the numbers are pre-wash or post-wash at the top of the sheet. Everything below is what each of those means and what it costs to skip.
What a point of measure actually is
Most people write specs as a list of numbers with labels. Chest 52. Length 71. Sleeve 62. That looks like a specification and behaves like a rumour, because none of those labels says where the tape sat.
A real point of measure, POM in every factory email you will ever get, has four parts:
- A name that both sides use identically, every season, on every style.
- A locationprecise enough to find without asking. Not “chest” but “across the garment, 2.5 cm below the armhole seam”.
- A method: garment flat or on the body, half measurement or full circumference, closure done up or open, along the seam or edge to edge.
- A tolerance, so a good garment can be recognised as good.
Drop any one of the four and the measurement stops being checkable. This is exactly the discipline an engineering drawing applies when it places a dimension: the number means nothing until the drawing says which two features it runs between. Apparel arrived at the same conclusion from the other direction, and tolerances work the same way here as they do on a machined part. Fabric just moves more than steel.
Setting up so the numbers repeat
Repeatability beats precision here. A measurement that is consistently half a centimetre generous is workable, because it applies to the fit sample you approved and to the bulk you receive. A measurement that drifts depending on who took it is worthless at any accuracy.
- Hard, flat table. Carpet, a bed and a padded cutting mat all let the garment sink and read wider. Use a surface that does not give.
- No tension, and no smoothing that stretches. Lay the piece down, pat it flat, walk your hands outwards from the centre. Never pull the hem to make it look neat.
- Close what closes. Button the placket, zip the front, fasten the cuff. Then write on the sheet that you did.
- One tape, one unit. Pick centimetres or inches for the whole pack. A sheet that mixes them will eventually be read in the wrong one, usually on the day the cutter is behind schedule.
- Measure edge to edge or seam to seam, and say which. A shoulder read to the outside of the seam and one read to the stitch line differ by the seam allowance, which is the whole tolerance you were arguing about.
- Let knitted fabric rest. Anything jersey, ribbed, French terry or fleece should sit flat for a few hours after being pressed, folded or shipped before you record a width.
One habit is worth more than the other five combined: measure the same garment twice, an hour apart, without looking at your first sheet. Any line where the two readings disagree is a line your factory will also read differently, and it needs a better location description rather than a tighter tolerance.
Tops: tees, shirts and sweats
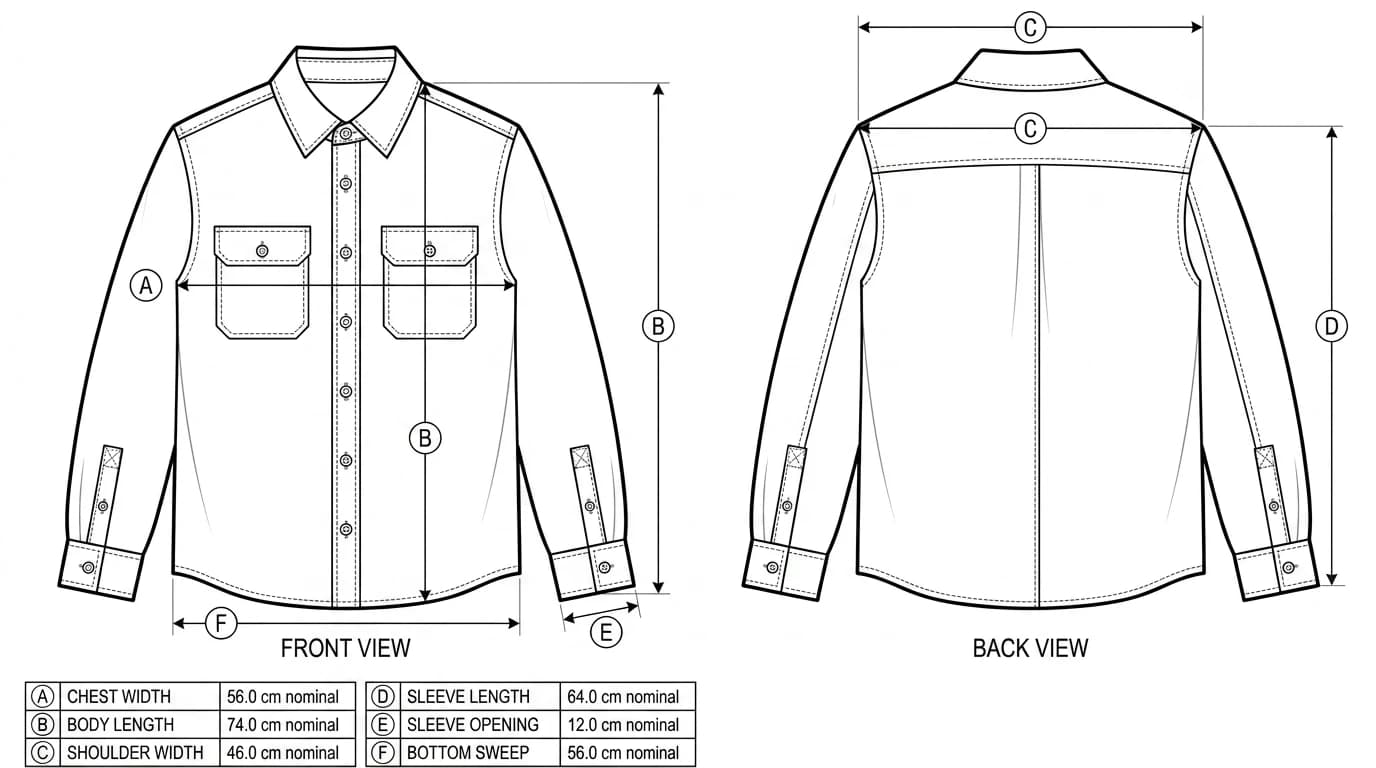
Every top spec is built from the same core, then extended for the construction. These are garment measurements taken flat, so widths are half the circumference of the finished piece.
Core points of measure, top, garment laid flat
What a shirt adds
A button-down carries a second layer of measurements that decide whether it looks like a shirt or like a shirt-shaped object: collar point length, collar band height, collar spread, placket width, button spacing from the top button down, yoke depth at centre back, cuff height, and the length and position of the sleeve placket. Pocket position is given as two numbers, down from HPS and across from centre front, never as one.
What a sweat or hoodie adds
Rib measurements are their own category and they are the ones that go wrong quietly. Spec the cuff rib height, the hem rib height and the rib width relaxed rather than stretched, because a rib recorded under tension will be cut short and the garment will flare. On a hood you need hood height from the neck seam to the top, hood width across the opening, and the drawcord eyelet position measured from the centre front seam.
Jackets and outerwear
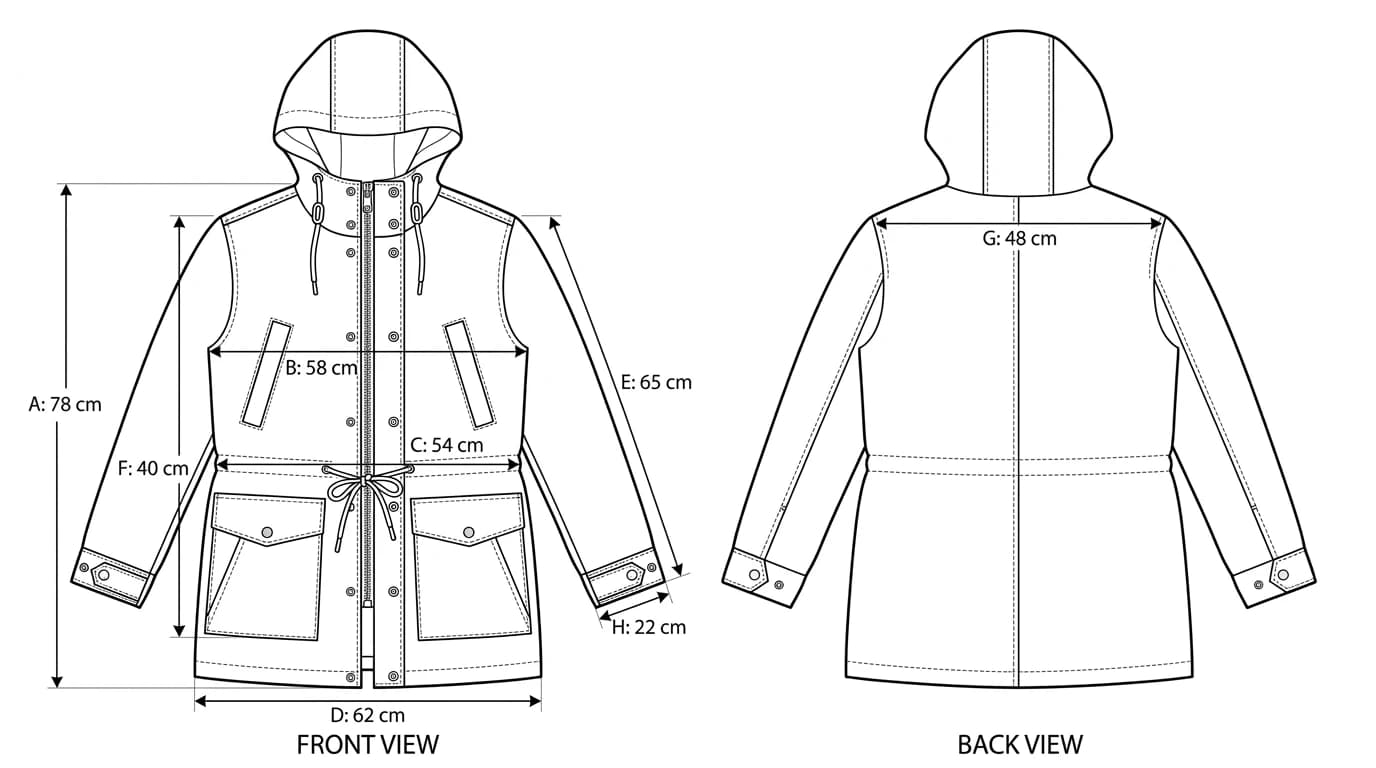
Outerwear inherits the whole top list and then adds the things that make a jacket a jacket. The extra readings all exist because a jacket is worn over something and closed around it, so the closure and the layering allowance are what people actually feel.
Additional points of measure, jackets and outerwear
The armhole line deserves a warning. Straight armhole and curved armhole differ by two to four centimetres on the same jacket, and both are legitimate methods used by different factories. Write which one the sheet means, ideally with a small diagram on the flat, because this is one of the readings a factory will not query. They will just measure it their way and report a pass.
Trousers, shorts and skirts
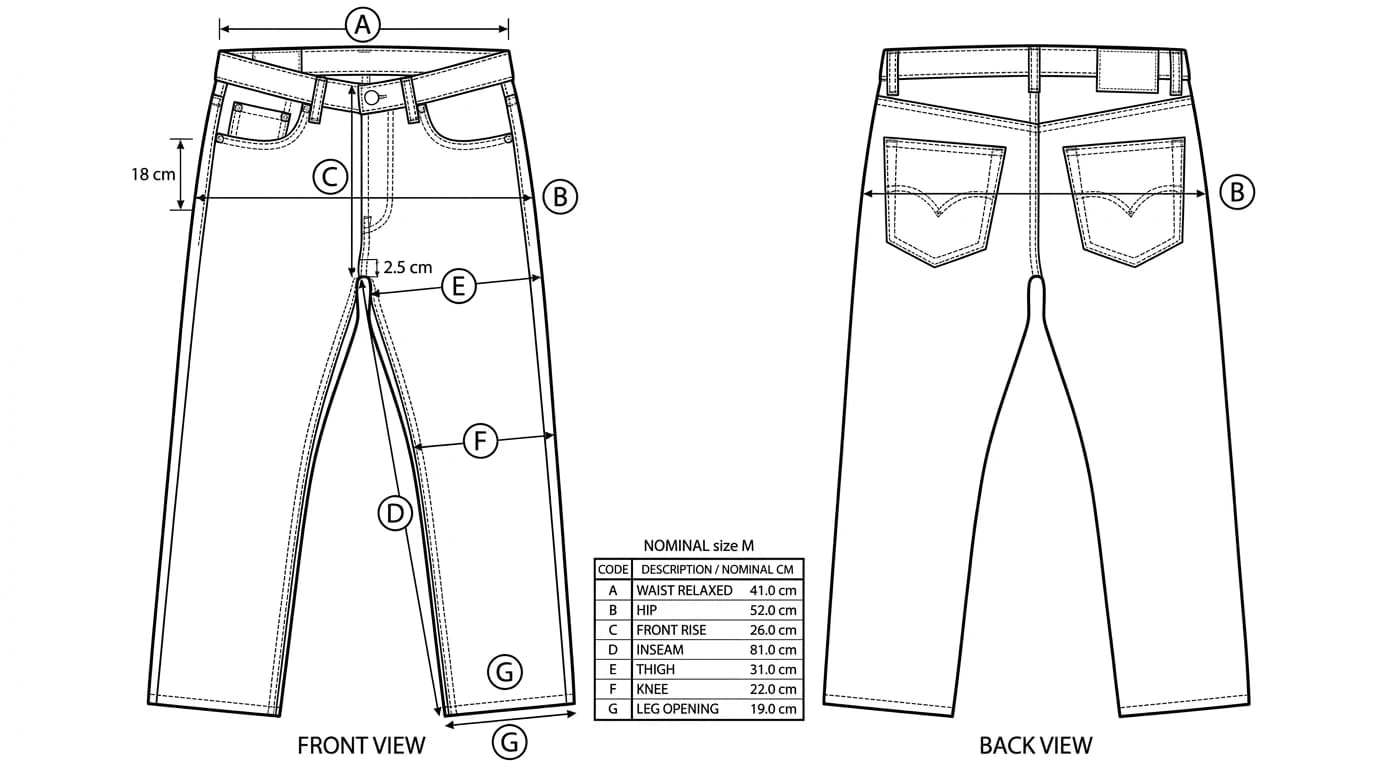
Bottoms are where half measurements and full circumferences get mixed most often, because a waistband is genuinely quoted both ways in different parts of the industry. Pick one convention and put it in the header of the sheet.
Points of measure, trousers and shorts, garment laid flat
Two of those carry hidden decisions. The hip drop, 18 cm below the waistband, is a convention rather than a law, and factories in different regions use anything from 15 to 20 cm. The knee point has no convention at all. Both need the distance written next to the reading or the number is uncheckable.
Skirts
A skirt spec is shorter and mostly borrowed: waist relaxed and extended, hip at a stated drop, skirt length measured from the top of the waistband at centre back, sweep across the hem, plus vent or slit length and any panel widths that define the shape. On a bias cut style add the note that measurements are taken after the garment has hung for twenty four hours, because bias drops and a spec taken straight off the machine is not the garment anyone receives.
Dresses and one-pieces
A dress is a top and a skirt sharing a spec sheet, with one extra problem: the waist is wherever you decide it is. Empire, natural, dropped and undefined waists all exist in the same size range, so the waist position has to be a measured distance from HPS before the waist width means anything.
Points of measure specific to dresses and jumpsuits
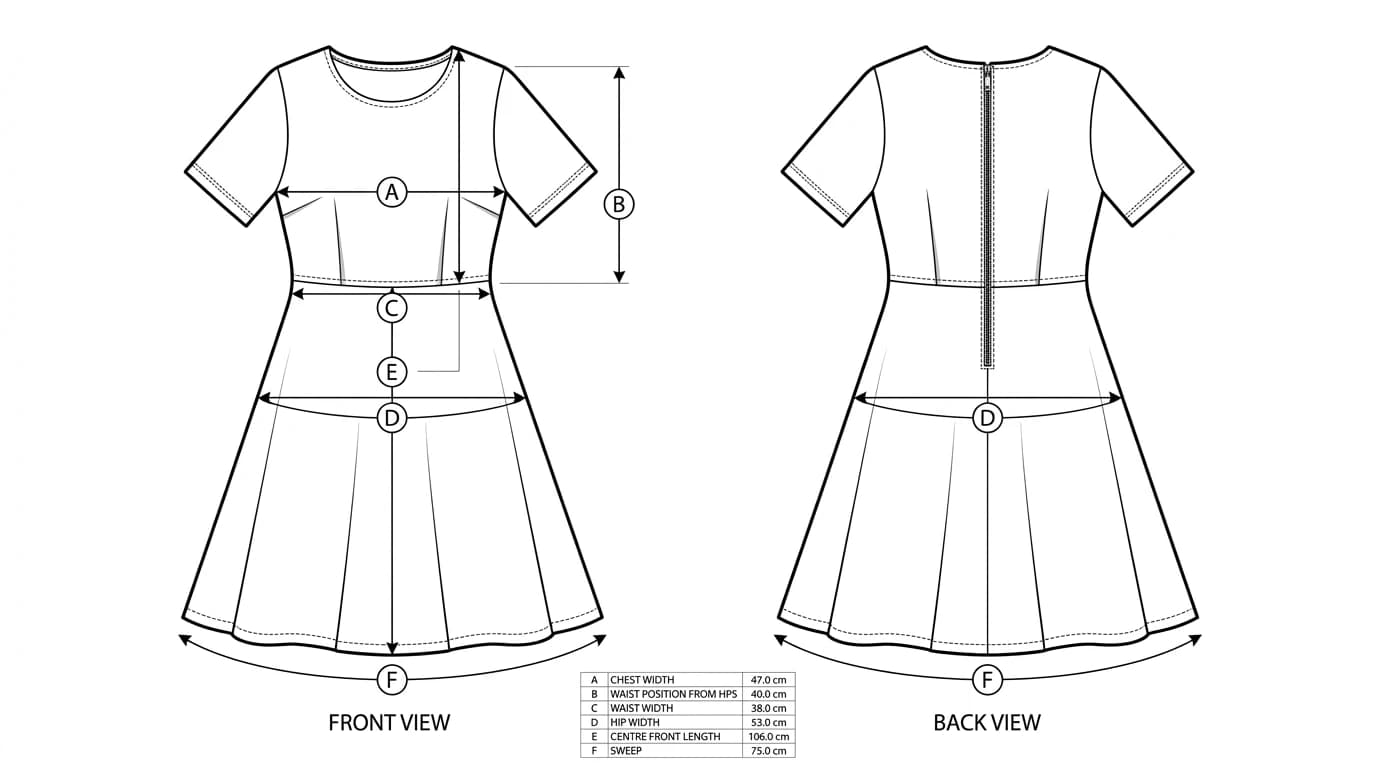
Knits move, wovens hold
The same tape and the same discipline give you a much softer number on a knit than on a woven, and pretending otherwise causes arguments that look like quality problems and are really measurement problems.
On knitted fabric:
- Relax before measuring. Jersey that has been rolled, folded or pressed reads narrow and short until it recovers. A few hours flat is the minimum, and a fit sample that arrived compressed in a courier bag needs longer.
- Never measure rib under tension. Record cuff and hem rib relaxed, and if the stretched figure matters, spec it as a second separate reading.
- Open the width tolerances. Chest and sweep on a jersey tee move more between two good garments than they do on a poplin shirt, and a tolerance tight enough for the shirt will reject perfectly saleable knitwear.
- Spec after wash on anything washed. Jersey shrinks in length far more than in width, so the body length on a garment washed style must be a post-wash number.
On wovens the fabric holds its shape, so tighter tolerances are realistic, but the readings become sensitive to construction instead. Seam allowance pressed one way rather than open changes a width. A fused interlining in a placket or a collar stand changes a length. That is why the spec has to state edge to edge or seam to seam.
Tolerances: the column everyone leaves blank
This is the part of the sheet people skip, and it is the part that decides whether a bulk delivery is accepted or argued over for three weeks. A tolerance is not sloppiness. It is you stating, in advance, what counts as correct, and it protects both sides.
Typical starting tolerances, garment measured flat. Agree the final set with your factory.
Three rules make tolerances behave. First, tolerance every line, including the boring ones, since a blank cell is read as either zero or infinity depending on who is under pressure. Second, do not tighten a tolerance to fix a fit problem: if the sample is out, the pattern or the spec is wrong, and squeezing the tolerance just moves the fight to the QC table. Third, tight tolerances cost money. Every fraction you take out of the allowed range raises the rejection rate, and the factory prices that in whether or not it tells you.
Where the size run comes from
Everything above describes one garment in one size. That size is your base size, it goes at the top of the sheet, and every other size in the run is derived from it by grade rules rather than measured independently.
A grade rule is the amount a point of measure changes between consecutive sizes. Typical starting points for a straightforward adult top, expressed as flat garment measurements:
Common grade increments per size, adult top, garment flat
Two things about grading are worth internalising. It is a decision, not a measurement: two brands can grade the same base size differently and both be correct for their customer. And it is not proportional. Necks and shoulders grade far less than chests, which is why scaling a whole pattern up by a percentage produces a large size with a comically wide neck. Grading stays with a pattern maker or a grading system, in the same way a flat is never a sewing pattern.
Getting the numbers onto the flat
A measurement list and a drawing that do not reference each other are two documents that will drift apart by the second revision. The pairing that survives is simple: the flat carries a letter at every point, and the spec table has a column of matching letters.
- Measure the physical garment first. Tape, table, written down, before any drawing exists. The garment is the source of truth and the drawing is a report about it.
- Generate or draw the flat, front and back, at one scale. If the garment already exists you can photograph it laid flat and produce the flat from the photo with TechDraw AI for clothes, which is faster than redrawing a known piece by hand.
- Enter your measurements so the callouts carry the numbers you took. A photo has no absolute scale, so the drawing stays proportional until you anchor it with real readings. That limit is a property of getting dimensions from any photo, not of one tool.
- Letter every point on the drawing, A through however many you need, and key the table to those letters.
- Add the header block: base size, units, flat or body, half or full, pre-wash or post-wash, closures fastened or open. Six lines that remove six future emails.
- Version it. Style number, revision, date, and what changed. A spec sheet without a revision number will be sewn from the wrong copy eventually.
The finished spec sheet is one of the sheets inside the wider pack. Our guide to building a tech pack covers the rest of them, from the bill of materials to the construction callouts, and how the set fits together.
What actually goes wrong
- Half versus full circumference.The classic, and the most expensive. A chest of 52 cm flat is a 104 cm garment. Somebody who reads it as a body circumference will make you a garment for a child. Put “garment flat, half measurement” in the header and repeat it in the column title.
- HPS confused with centre back neck. Both are valid origins for a length and they differ by the back neck drop, which is two to three centimetres on most tops. Enough to make a body length look wrong on a garment that is right.
- Measuring a knit under tension. Straightening a jersey tee by pulling the hem adds a centimetre to the sweep that exists only while your hand is on it.
- No base size stated. A spec with no base size cannot be graded, so the factory guesses, usually at M, and your S and XL come back built from a different assumption than the one you had.
- Pre-wash numbers on a washed style. You approve a fit sample that stops existing the first time it goes through the laundry.
- Mixed units on one sheet. A cuff in inches next to a sleeve in centimetres is a mistake waiting for a deadline.
- Placement given as one number. A pocket, a logo or an embroidery position needs a vertical and a horizontal reading. Give one and it can sit anywhere along the other axis.
- Copying a spec from a garment you did not measure. Lifting numbers from a competitor's size chart imports their measuring conventions, which you do not know, into your sheet.
The measuring checklist
- Base size stated and every number on the sheet taken in it.
- Units consistent across the whole pack, stated in the header.
- Garment flat, half measurement declared explicitly, or the alternative declared just as explicitly.
- Pre-wash or post-wash stated, and matched to how the style is actually finished.
- Every point has a location description, including the drops for hip, thigh and knee.
- Every line has a tolerance, opened up on knits.
- Points lettered on the flat and keyed to the table, front and back.
- Placement measurements have two numbers, vertical and horizontal.
- Closures stated as fastened or open where it changes a reading.
- Style number, revision and date on every page.
Work through that and the spec stops being a list of numbers and starts being a contract that a factory on the other side of the world can hold up against a garment. Measure the sample properly, then photograph it laid flat and let TechDraw AI draw the flat and place your callouts, so the hours go into the readings that decide the fit rather than into redrawing a garment you are already holding.
Frequently asked questions
What are points of measure in a tech pack?
Points of measure, usually shortened to POM, are the named places on a garment that you and your factory agree to measure, together with the method used at each one. A POM is not just a number: it is a name, a location, a way of taking the reading and a tolerance. Chest width measured 2.5 cm below the armhole across the garment laid flat is a point of measure. The word chest on its own is not.
How do you measure a t-shirt for a tech pack?
Lay it flat on a hard table with no tension, smooth it without stretching, and take five core readings: chest width across the garment 2.5 cm below the armhole, body length from the high point of the shoulder straight down to the hem, shoulder width seam to seam, sleeve length from the shoulder seam to the cuff edge, and bottom sweep across the hem. Add neck width, front neck drop and sleeve opening if the fit matters. State that the widths are half measurements taken flat, not body circumferences.
What tolerance should I put on garment measurements?
As a starting point for wovens, plus or minus 1.3 cm on widths such as chest and waist, plus or minus 1.3 cm on lengths such as body and inseam, plus or minus 0.6 cm on shoulder and sleeve length, and plus or minus 0.3 cm on small details such as cuff height or pocket position. Knits usually need the widths opened up because the fabric relaxes. The exact figures matter less than having one on every line, since a blank tolerance means the factory picks its own.
Do you measure a garment flat or around the body?
A tech pack spec is almost always a garment measurement taken flat, not a body measurement. That means a chest reading is half the circumference of the garment, taken straight across from edge to edge. Body measurements belong in your size chart for the customer, and mixing the two is the single most expensive confusion in apparel specs. Write flat, half measurement at the top of the sheet so nobody has to guess.
What does HPS mean on a spec sheet?
HPS is the high point of the shoulder, the highest point of the shoulder seam where it meets the neckline. It is the standard origin for vertical measurements on a top, so body length, sleeve length on a raglan, waist placement on a dress and pocket placement are all quoted as a distance from HPS. Using the centre back neck instead is also valid, but it gives a different number, so the sheet has to say which one it uses.
How many points of measure does a tech pack need?
For a simple tee, eight to twelve is enough. For a tailored jacket or a dress with a defined waist, twenty to thirty is normal. The right test is not the count, it is whether every measurement that would change how the garment fits or reads is on the sheet. Anything you leave off is a decision you have handed to the factory, and anything you put on you have to check on every sample, so padding the list has a cost too.
Should the spec be before or after washing?
State it explicitly, because the two are different garments. If the style is garment washed, garment dyed or made in a fabric that shrinks, the meaningful spec is the finished, post-wash measurement, and the factory works backwards to a cutting spec using the shrinkage they measure on your fabric. If you spec pre-wash numbers on a washed style, you will approve a fit sample that no longer exists after the laundry.
Sources
- ISO 8559-1:2017 Size designation of clothes, Part 1: Anthropometric definitions for body measurement
- ISO 8559-2:2017 Size designation of clothes, Part 2: Primary and secondary dimension indicators
- ASTM D5219 Standard Terminology Relating to Body Dimensions for Apparel Sizing
- Single View Metrology in the Wild (ECCV 2020): absolute scale cannot be recovered from one image without a known reference