
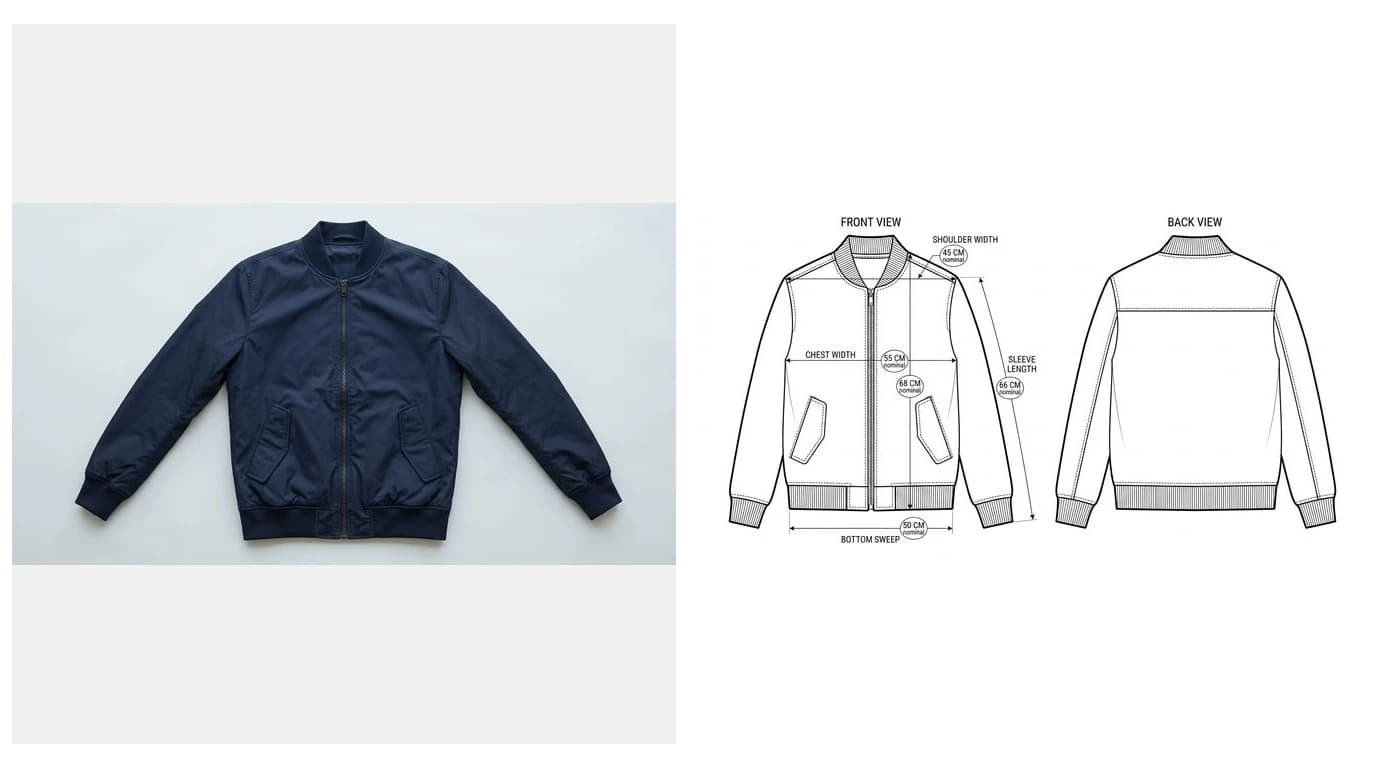
A factory does not know what is in your head, does not share your vocabulary, and in most cases is reading your document in a second language while quoting four other brands the same week. The tech pack is the only thing standing between your idea and whatever they decide it probably meant. This is what belongs in one, sheet by sheet, and how to build it when the garment already exists as a sample in front of you.
Our articles are still written by humans!
Get human written articles in your Google feed.
What a tech pack is and who reads it
A tech pack, sometimes called a spec pack or a technical package, is the complete manufacturing specification for a single garment style. It is not a mood board and not a lookbook. It is closer in spirit to a manufacturing ready engineering drawing: a document whose only job is to remove ambiguity from production.
It gets read by more people than you expect, and that shapes how you write it:
- The costing team reads the materials and construction to quote you. Vague construction means a padded quote.
- The pattern maker reads the flats and the spec sheet to draft the pattern in your base size.
- The sample room reads the construction callouts and builds the first sample.
- QC reads the measurements and tolerances to decide whether the bulk run passes.
- You, next season, when you carry the style over and cannot remember why the pocket sat where it did.
What a missing tech pack actually costs
The reason to take this seriously is not tidiness, it is sampling rounds. Every ambiguity in the pack turns into a sample that comes back not quite right, and each round costs sample fees, courier charges in both directions, and typically two to four weeks of calendar time. Miss two rounds on a style and you have lost a season, not a week.
The pattern is consistent: the questions the factory does not ask are more expensive than the ones they do. A factory that emails you asking which pocket bag you want has cost you a day. A factory that quietly picks one because your pack did not say has cost you a sample.
The sheets a tech pack is made of
Formats vary between brands, but the content does not really. A workable pack has these pages, in roughly this order:
A standard tech pack, page by page
1. The flats page
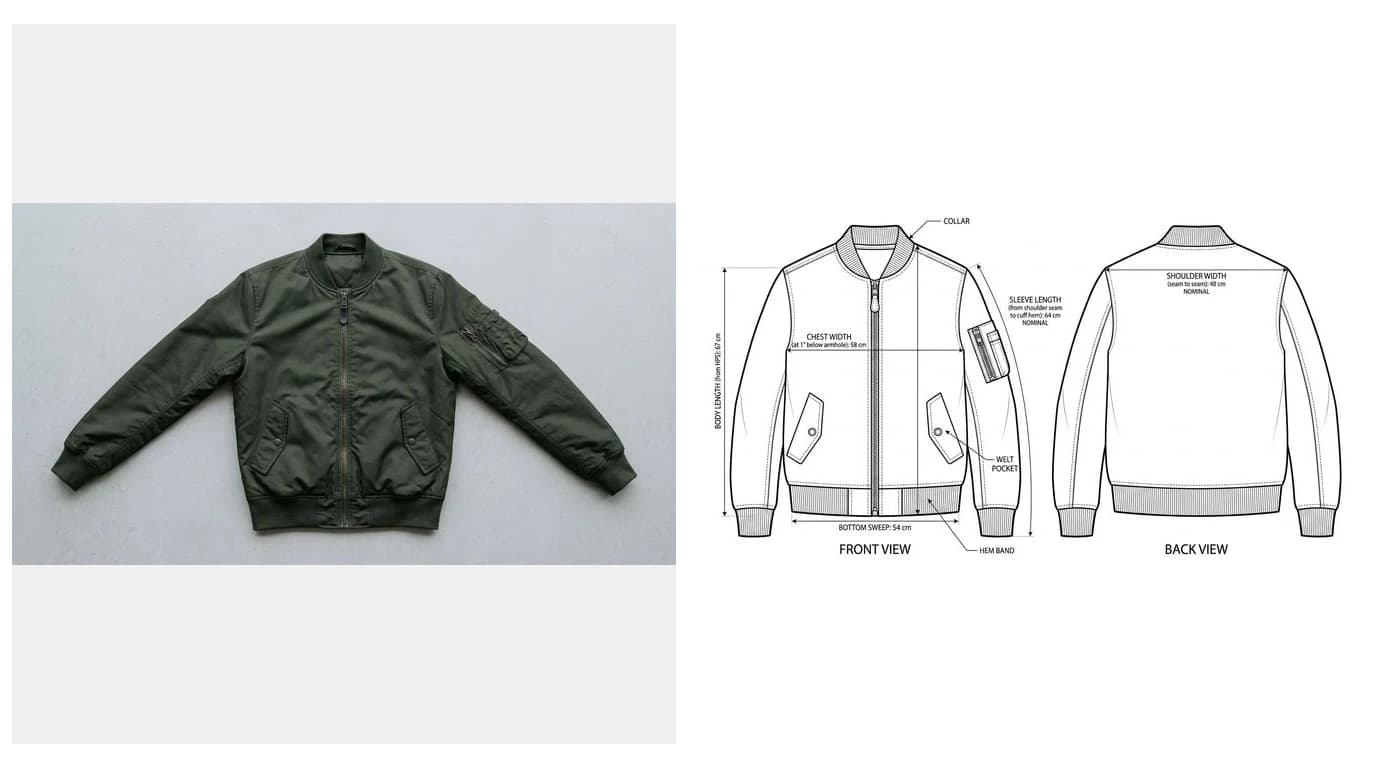
Everything else in the pack refers back to the flats, so they carry more weight than any other page. They must show the front and the back at the same scale, symmetrical, in flat black and white line work with no drape and no shading, plus a detail view for anything a construction question could hang on.
If the garment already exists as a sample or a reference piece, you do not have to draw them by hand. Photograph it laid flat, straight from above, and generate the flat from the photo. Our guide to making a fashion flat from a photo covers how to shoot it, which measurements to take first, and the line weight conventions that make a flat readable to somebody who has never seen the garment.
Two rules people break constantly. First, the back view is not optional: back yokes, back darts, centre back seams and back pocket placement are invisible from the front, and a missing back view is one of the most reliable ways to buy an extra sample. Second, keep the flats at print legibility. A flat that only resolves when you zoom to 200 percent on your own monitor is useless on the printed sheet taped above a sewing machine.
2. The spec sheet and points of measure
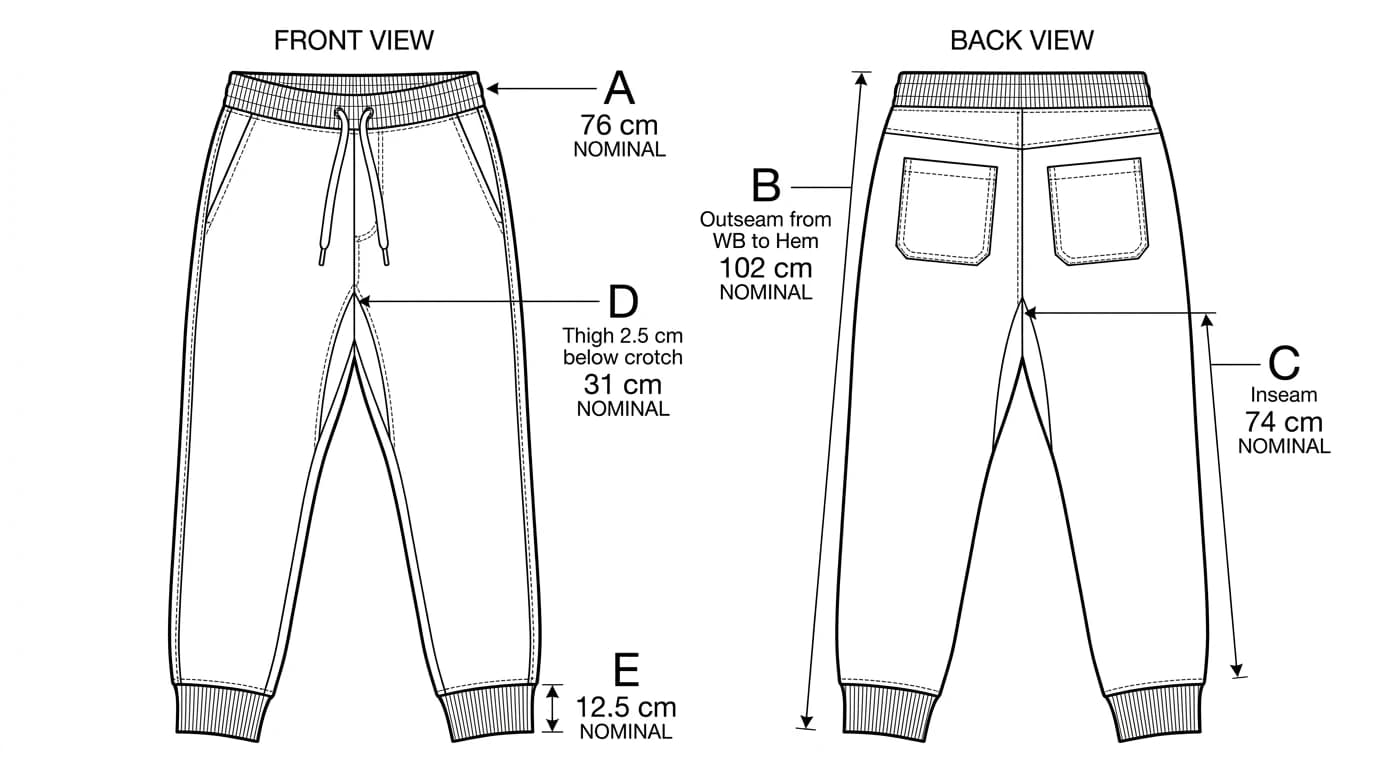
The spec sheet is the measurement contract. It lists each point of measure by name, gives its value in the base size, and states the tolerance you will accept. Naming is half the work, because “chest” on its own means nothing: measured where, across or around, garment flat or on the body. ASTM D5219 exists to standardise that vocabulary, and ASTM D5585 publishes body measurement tables you can sanity check your sizing against.
A spec sheet row has four parts, not one
Three things turn this from a table into a usable spec. Name the base size explicitly on the sheet, because a spec with no base size cannot be graded from. Put a tolerance on every row, since fabric relaxes and cutting and sewing both vary, and an unstated tolerance is a tolerance the factory chooses. And state the grade rules, the increment each measurement steps by between sizes, or accept that the factory will apply their house rules to your garment.
3. Bill of materials and trims
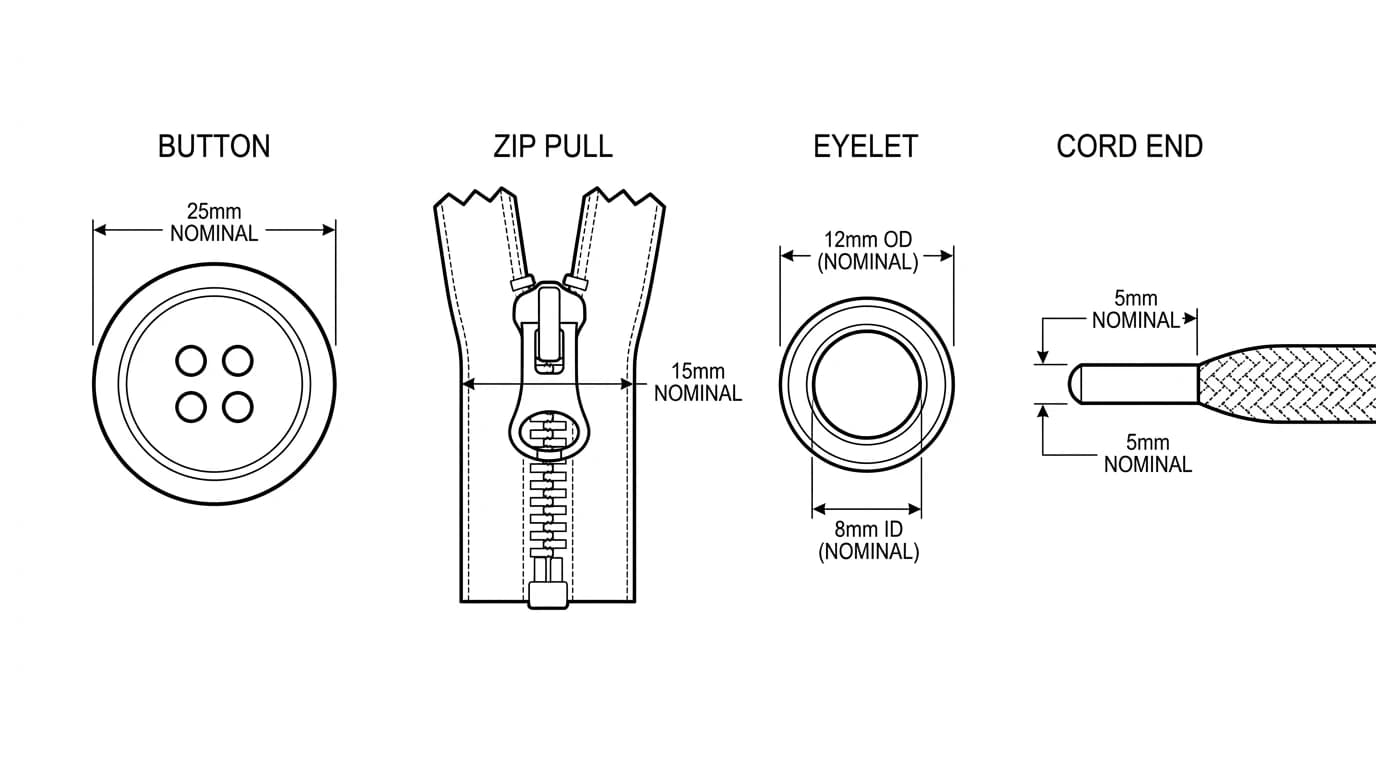
The BOM lists everything the garment is physically made of. Vagueness here goes straight into the quote, because a factory that cannot identify your trim prices the one they have in stock.
- Fabric: composition by percentage, weight in gsm or oz, construction such as twill or jersey, finish, and width. Add a reference to a physical swatch if you have one.
- Lining and interlining: same detail, and where each is used, since a jacket may have three.
- Thread: type, ticket number, and colour matching rule such as match to body or tonal contrast.
- Hardware: buttons by ligne size and material, zips by brand, gauge and type, snaps, rivets, eyelets, cord and cord stoppers.
- Labels: brand, size, care and content, plus any hang tags.
- Colourways: name each one and give a colour reference for every component in it, not just the body fabric.
Give every line a supplier and a reference number where you have one. “Antique brass shank button, 24L” is a specification. “Gold button” is a wish.
4. Construction, stitch and seam callouts
This is the page that decides both the price and whether the sample comes back looking like your reference. It says how each area is sewn and finished.
Use the numbers
Stitch types are classified under ISO 4915 and seam types under ISO 4916, with the ASTM equivalent in D6193. A 301 is a lockstitch, a 401 a chainstitch, a 504 a three thread overlock. Naming the class removes an entire category of misunderstanding, because a number reads the same in every language and “neatly finished” does not.
Specify per area, not once globally
Side seams, armholes, hems, plackets and pocket attachments are different problems. A single line saying all seams overlocked is how you end up with an overlocked hem you wanted double needle. Walk the garment area by area and say what happens at each.
Do not forget the invisible things
- Seam allowances, area by area where they differ.
- SPI, stitches per inch, since 7 SPI on denim topstitch and 12 SPI on a shirt seam are both right for different garments.
- Bartacks: where, how many, how long. Pocket corners and fly ends are the usual answer.
- Interlining and taping: which panels, which type, fused or sewn.
- Pressing and finishing, if the garment needs anything specific.
5. Artwork, labels, care and packing
The last sheets are the ones people rush, and they are the ones that generate customs problems and returns rather than sampling problems.
- Artwork: supply print, embroidery or applique as vector files, and specify placement by measurement from a fixed point, such as 8 cm down from the high point of the shoulder, rather than “centre chest”. Give the method, the size and the colours.
- Labels: brand label, size label, and the care and content label, each with exact placement and exact wording. Fibre content wording is regulated, not a style choice.
- Care instructions: in the US the FTC Care Labeling Rule requires a full set of care instructions or a warning, and in Europe the GINETEX symbols are the common language. Decide which markets you are selling into before you write the label, since the label is printed thousands of times.
- Packing: how the garment is folded, polybag type and any required warnings, hang tag position, carton quantities, barcodes.
Building one from a garment you already have
Most first tech packs are not written from nothing. There is a sample, a fit sample with corrections, a previous season being carried over, or a reference garment bought to study. In that case the order that works is this:
- Measure the garment flat on a table with a tape measure, and write down every point of measure before you touch a computer. This is the step people skip, and every later number depends on it.
- Photograph it laid flat, straight from above, front and back separately, plus close-ups of the cuff, placket, pockets and hardware.
- Generate the flats from those photos with TechDraw AI for clothes, entering the measurements you took so the callouts carry your real numbers.
- Check the flats against the garment, not against the photo. A shadow or a fold can read as a seam, and you catch that in seconds with the sample in your hand.
- Take the garment apart visually area by area and write the construction sheet as you go: seam type, stitch type, SPI, finish.
- List every trim you can see, with size and material, and mark the ones you still need to source.
- Add tolerances and grade rules, then export the whole thing as one PDF named with the style number and version.
The same discipline applies in every field where a physical object has to become a document. It is the apparel version of reverse engineering a part, and the thing that separates a usable spec from a nice looking one is always the boring completeness rather than the drawing quality.
Mistakes that cost you a sampling round
- No back view. The single most common omission, and the most reliably expensive.
- No base size stated. The spec sheet becomes ungradeable and the pattern maker guesses.
- No tolerances. Either you reject good bulk or the factory sets its own.
- Points of measure named but not defined. “Chest” without “1 in below armhole” is two different numbers.
- Trims described by adjective. Gold, chunky and vintage are not sourcing instructions.
- Construction specified once, globally. Every area needs its own answer.
- Artwork placed by phrase rather than measurement. Centre chest lands somewhere different on every size.
- No version number. Nobody can prove which pack the sample was built from.
- Flats that only read when zoomed in. The pack gets printed, and the print is what the sample room uses.
None of those are skill problems. They are completeness problems, which means a checklist fixes them. Start with the garment on the table and a tape measure, get the flats out of a photograph instead of an afternoon of tracing, and spend the time you save filling in the fields that would otherwise be answered by somebody who has never spoken to you.
Frequently asked questions
What is a tech pack?
A tech pack is the complete manufacturing specification for one garment style: technical flats of the front, back and details, a measurement spec sheet with points of measure and tolerances, a bill of materials for fabric and trims, construction and stitch callouts, artwork placement, and label, care and packing instructions. It is the document a factory quotes from and sews the first sample from.
Can I make a tech pack myself without a designer?
Yes, and plenty of small brands do. The parts that genuinely need a specialist are pattern making and grading, which sit outside the tech pack anyway. Everything else is disciplined documentation: measure the garment, draw the flats, list the trims, state the tolerances. The most common failure is not lack of skill, it is leaving fields blank and letting the factory guess.
How do I make the flats for a tech pack without Illustrator?
If the garment exists as a sample or a reference piece, photograph it laid flat and generate the technical flat from the photo. TechDraw AI produces front and back flats with measurement callouts you can drop straight into the pack. Illustrator is still useful for editing and laying out the finished sheets, but it is no longer the only way to get the drawing itself.
Does a tech pack include the sewing pattern?
No. A tech pack specifies what the garment must be. The pattern is how it gets cut, and it is produced by a pattern maker from your spec, or supplied by the factory if they offer full package production. Keep the two separate: a tech pack that tries to be a pattern usually ends up being neither.
What tolerances should I put on a tech pack?
Typical starting points for wovens are plus or minus 1/4 in on widths such as chest and waist, plus or minus 1/2 in on lengths such as body and sleeve, and plus or minus 1/8 in on small details such as a cuff height or a pocket position. Knits usually need looser tolerances because the fabric relaxes. The exact numbers matter less than having them stated, since a spec with no tolerance means the factory chooses one for you.
What file format should I send a tech pack in?
PDF is the safe default, because it renders identically everywhere and nobody needs your fonts. Send it as a single multi-page PDF per style, named with the style number and version, and keep the editable source in whatever tool you built it in. Some factories also want the flats as vector files so they can zoom into detail without it going soft.
Sources
- ISO 4915:1991 Textiles: Stitch types, Classification and terminology
- ISO 4916:1991 Textiles: Seam types, Classification and terminology
- ASTM D6193: Standard Practice for Stitches and Seams
- ASTM D5585: Standard Tables of Body Measurements for Adult Female Misses Figure Type
- US Federal Trade Commission: Clothes Captioning, Complying with the Care Labeling Rule
- US Federal Trade Commission: Threading Your Way Through the Labeling Requirements Under the Textile and Wool Acts
- GINETEX: the international care labelling symbols