You have a photo of a part, a bracket, a gasket, a panel, and you need real numbers off it. The good news: you can pull accurate dimensions from a single picture. The catch: a photo on its own has no size at all. Get one thing right and the rest is simple arithmetic. Skip it and every number you read is a guess.
Why a photo has no size until you give it one
Here is the part most “measure from a photo” tutorials skip. A camera flattens the 3D world onto a 2D sensor, and in doing so it throws away distance. A small object close to the lens and a large object far away can produce exactly the same pixels. This is not a limitation a sharper camera or smarter app will fix, it is the projective geometry of how images form. Every single-image measurement method recovers shape only up to an unknown scale factor.
So a bare photo gives you ratios, this edge is twice as long as that hole is wide, but never a millimetre. To turn ratios into real lengths you have to feed in one piece of outside information: a known size somewhere in the frame. That known size is your reference, and it does all the work. For the one-minute version of this idea, see can you get dimensions from a photo; the same physics drives why a photo alone can never tell you a part's true size.
The reference method, step by step
The whole technique is putting a known length next to the unknown one and letting the ratio between them carry the scale. Done carefully it is genuinely accurate. Here is the routine:
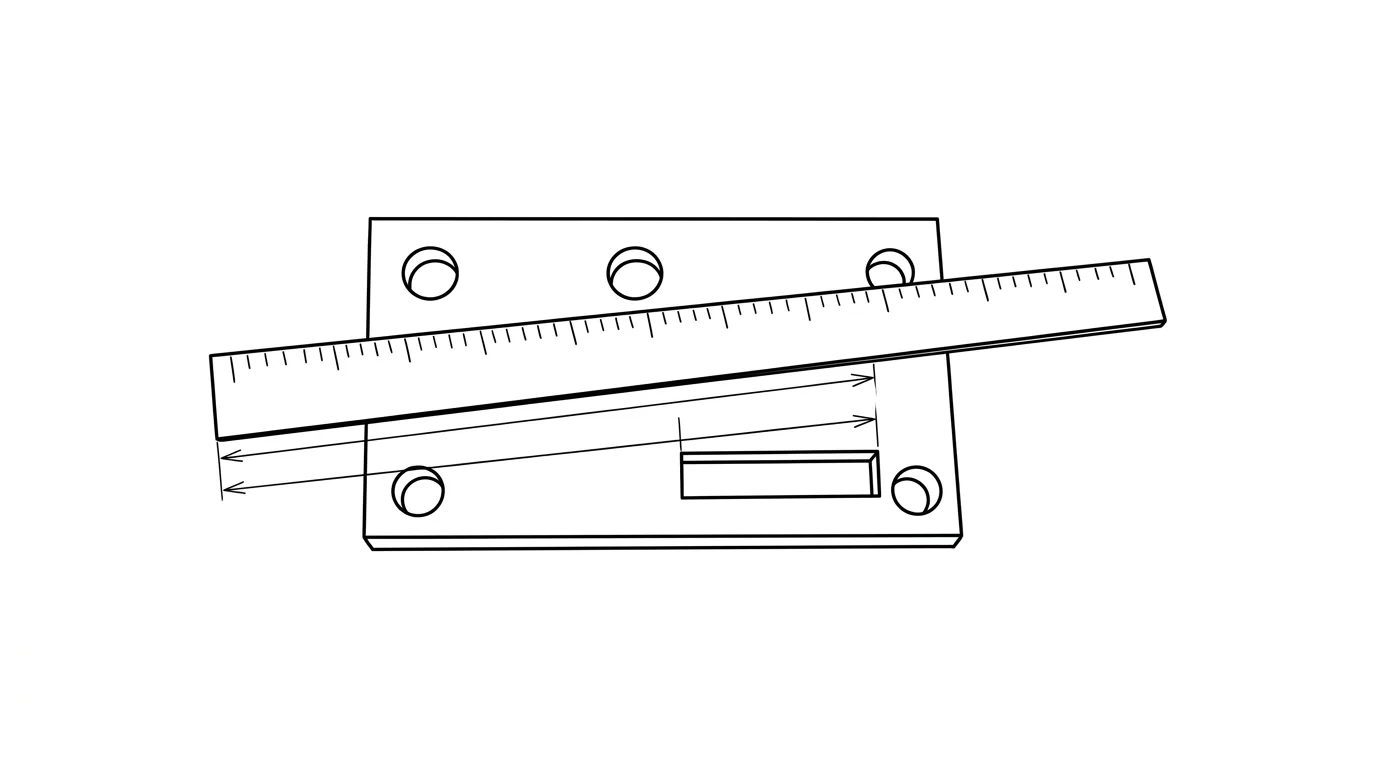
- Place a reference in the same plane as the part. Lay a steel ruler or tape flat onthe object's face, not on the table beside it. The reference must sit at the same distance from the lens as the feature you want to measure, or it scales wrong.
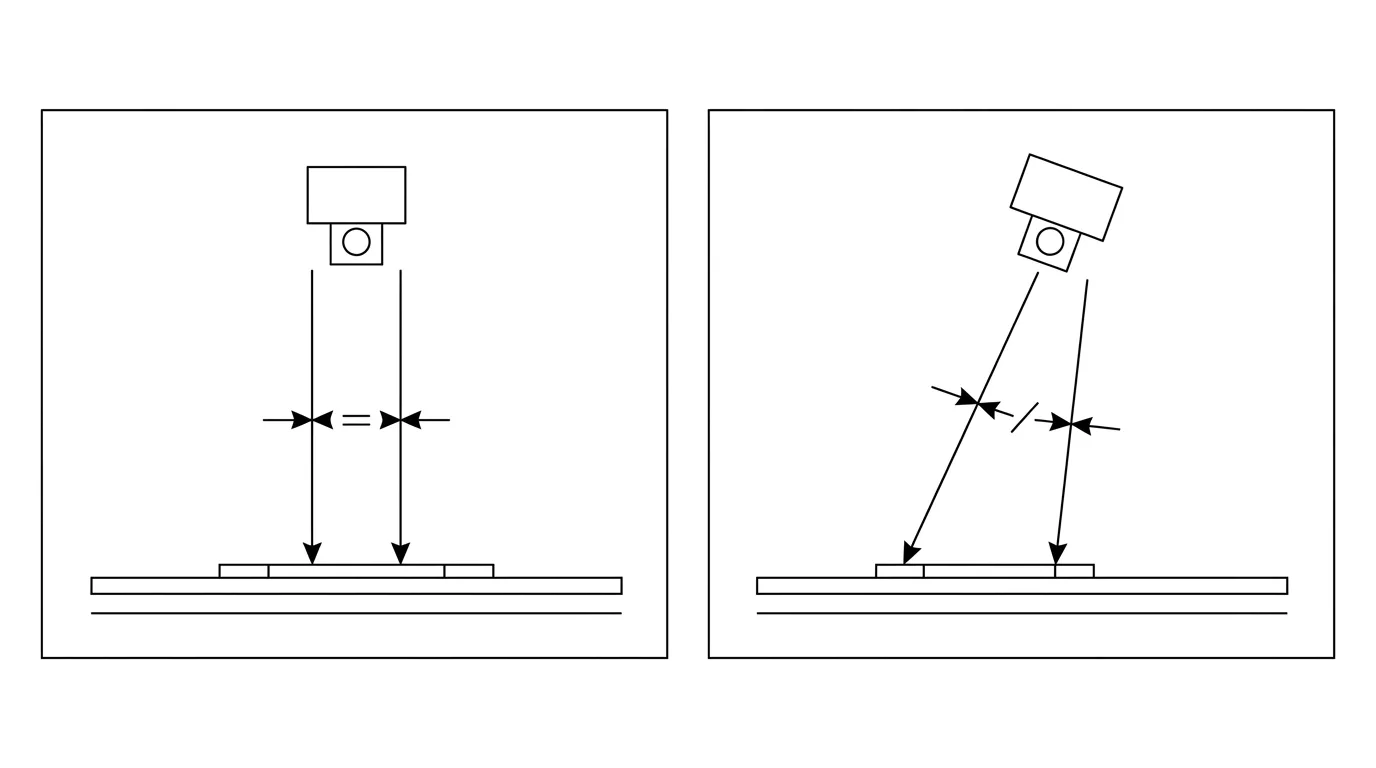
- Shoot square-on. Hold the camera at roughly 90° to the face, centred over the part, as far back as you can while still filling the frame. Distance and centring both fight perspective distortion.
- Open the photo in a measuring tool. A browser measure-on-image tool, the ImageMeter app, or even Inkscape with its measure tool all work. You mark the reference, type its real length, and the tool calibrates.
- Measure what you need. Draw a line across each feature and read off the real-world length. The tool is just applying the pixel math in the next section for you.
- Verify with a second known dimension. If a feature you can also measure physically reads correctly on screen, trust the rest. If it is off, your plane or angle was wrong, reshoot.

The math: turning pixels into millimetres
Behind every photo-measuring tool is one division. You do not need it if the app does it for you, but understanding it tells you exactly why the method works and where it breaks.
- Measure the reference in pixels. Say your ruler marks a 100 mm span that covers
400 pxon screen. - Compute the scale.
100 mm ÷ 400 px = 0.25 mm/px. Every pixel in this photo is worth a quarter of a millimetre. - Apply it to any feature. A hole spacing that measures
320 pxis320 × 0.25 = 80 mm.
That is the entire trick. The accuracy of every number you derive rides on two things: how precisely you marked the reference, and whether the feature is truly in the same plane as it. A reference that is twice as long gives you half the pixel-marking error, which is why a full-length ruler beats a coin, and a coin beats nothing.
How accurate is it really?
Honest expectations, because this is where people get burned. With a solid reference and a square-on, high-resolution shot, photo measurement is reliable to within about 1%, and rarely worse than 4%. A casual phone snap, tilted, with a tiny reference, drifts to 5–20%. The difference is entirely in how you shoot. The biggest error sources:
What moves the error, and how to shut it down
| Error source | What it does | How to control it |
|---|---|---|
| Camera tilt | Perspective makes near edges read longer than far ones | Shoot square-on at ~90°, centred over the part |
| Reference out of plane | A ruler on the table, not on the part, scales to the wrong distance | Lay the reference flat on the same face you measure |
| Small reference | Pixel-marking error is a bigger fraction of a short length | Use the longest reliable reference that fits the frame |
| Lens distortion | Wide-angle phone lenses bow straight lines near the edges | Back off and zoom, keep the part near the centre |
| Low resolution / blur | Soft edges make every pixel mark ambiguous | Fill the frame, focus, light it evenly |
And remember what a flat photo physically cannot show you no matter how well you shoot: hidden bores, the far side of the part, thread pitch, or depth. Those need a second view or a physical measurement, the same point we make in how accurate AI technical drawings are.
Five mistakes that wreck a photo measurement
- Resting the ruler beside the part, not on it. Even a centimetre of height difference changes the scale. Same plane, always.
- Shooting at an angle. A tilted shot looks fine to the eye and quietly stretches one direction. Get square-on.
- Using a tiny reference. A coin in the corner of a big panel multiplies your marking error. Scale the reference to the part.
- Getting too close with a phone. Macro distance plus a wide lens equals barrel distortion. Step back and zoom instead.
- Never checking a second dimension. One verification measurement is the difference between a number you trust and a scrapped part. It takes ten seconds.
Beyond one measurement: getting a whole drawing
Measuring by hand is perfect when you need one number, the bolt spacing, the width of a slot, the diameter of a flange. But if you are measuring from a photo, you usually do not want a single figure, you want a part you can remake: a dimensioned drawing or a cuttable file. Doing that feature by feature, line by line, is slow and error-prone.

This is the same reference trick, scaled up. Instead of marking one line at a time, a photo-to-drawing tool reads the whole part, proposes clean orthographic views and dimension lines, and asks you for one measured reference. That single value propagates through every dimension at once, so the entire drawing locks to true scale from a single caliper reading, exactly the workflow behind reverse engineering a part without drawings and the standard described in what makes a drawing manufacturing-ready.
That is what our image to DXF converter does: upload the photo, confirm one real measurement, and get a dimensioned drawing exported to DXF, DWG, SVG or PDF, no pixel arithmetic required. And if a file ever comes in the wrong size downstream, the same anchor-to-a-known-dimension habit fixes it, see why a DXF imports at the wrong size.
Frequently asked questions
How do I measure an object in a photo?
Put something of a known size in the same shot and in the same plane as the object, photograph it square-on, then measure both in pixels. Divide the reference's real length by its pixel length to get a scale in millimetres per pixel, and multiply any other feature's pixel length by that scale. Free tools like measure-on-image sites and ImageMeter do the arithmetic for you once you mark the reference.
What can I use as a reference object?
Anything with a known, trustworthy length that sits in the same plane as your part: a steel ruler or tape measure (best), a caliper reading on one feature, a coin, or a credit card (85.6 by 53.98 mm). The bigger the reference relative to the part, the smaller the error, so a ruler beats a coin.
Can I get dimensions from a photo without a ruler in it?
Only if you already know one real length on the part itself, for example a bore you measured with a caliper. That known dimension becomes your reference. With no reference of any kind, a photo is dimensionless: a small part up close and a large part far away produce identical pixels, so the software has nothing to scale from.
How accurate is measuring from a photo?
With a good scale reference and a square-on, high-resolution shot, error is usually under 1% and rarely over 4%. Casual phone measurements drift to 5 to 20% once the camera is tilted, the reference is small, or lens distortion is ignored. Always confirm with a second known dimension.
Can I get a full technical drawing from a photo, not just one measurement?
Yes. Measuring by hand gives you one number at a time; a photo-to-drawing tool reads the whole part, proposes orthographic views and dimension lines, and lets you anchor everything to a single measured reference so the entire drawing locks to true scale at once. That is exactly what TechDraw AI is built to do, and it exports the result to DXF, DWG, SVG and PDF.
Sources
- Object size from a photo: calibrated photo measurement accuracy (1–4%)
- Single View Metrology in the Wild (arXiv) — scale ambiguity in single-image measurement
- ImageMeter: measuring basics and setting a reference scale
- Make: Reverse-engineer a design by measuring pictures
- Measure in Photo Online — scale from a known reference