
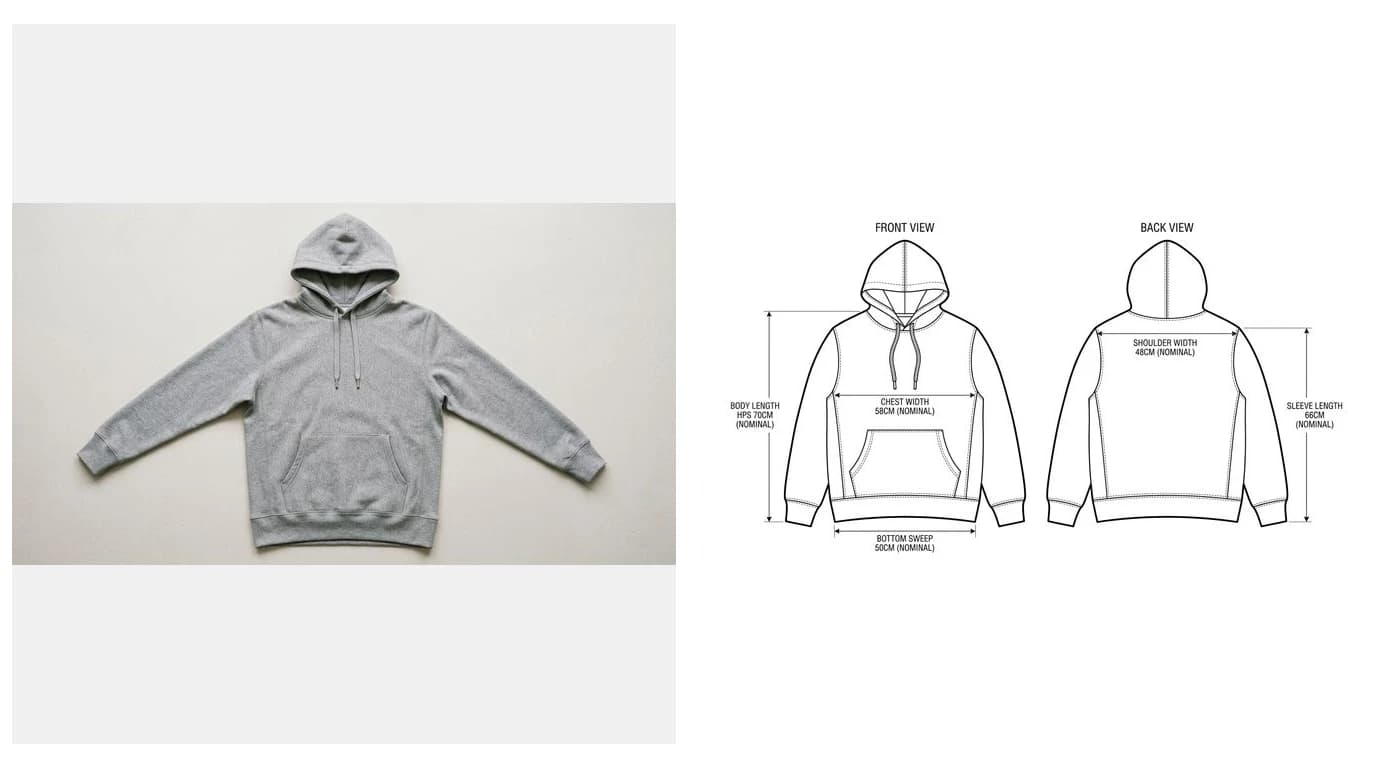
You have a sample in your hands, or a reference garment you bought to study, and your factory is waiting on a spec. The drawing they need is a flat: a clean, symmetrical, black and white view of the piece with every seam and closure in it. Drawing one in Illustrator takes an afternoon per style if you are good at it. This is how to get the same drawing out of a photograph instead, and where that shortcut genuinely stops working.
Our articles are still written by humans!
Get human written articles in your Google feed.
What a flat actually is
The vocabulary trips people up, so it is worth being precise. A fashion illustration is drawn on a stylised figure, usually with exaggerated proportions, and its job is to sell a feeling. A flat, also called a technical flat or a flat sketch, is the opposite: the garment drawn as though it were lying on a table, with no body inside it, no folds, no shadow and no texture. Left and right are mirror images of each other. Proportions match the real measurements rather than a fashion croquis.
That flatness is not a stylistic choice, it is the whole point. A factory pattern maker in a different country, often reading the sheet in a second language, has to see exactly where a seam sits and exactly how a pocket is attached, with no room to interpret. Drape and shading hide things. Flat line work does not. This is the same logic that makes machine shops insist on 2D drawings rather than 3D models: a dimensioned flat view is unambiguous in a way a pretty render never is.
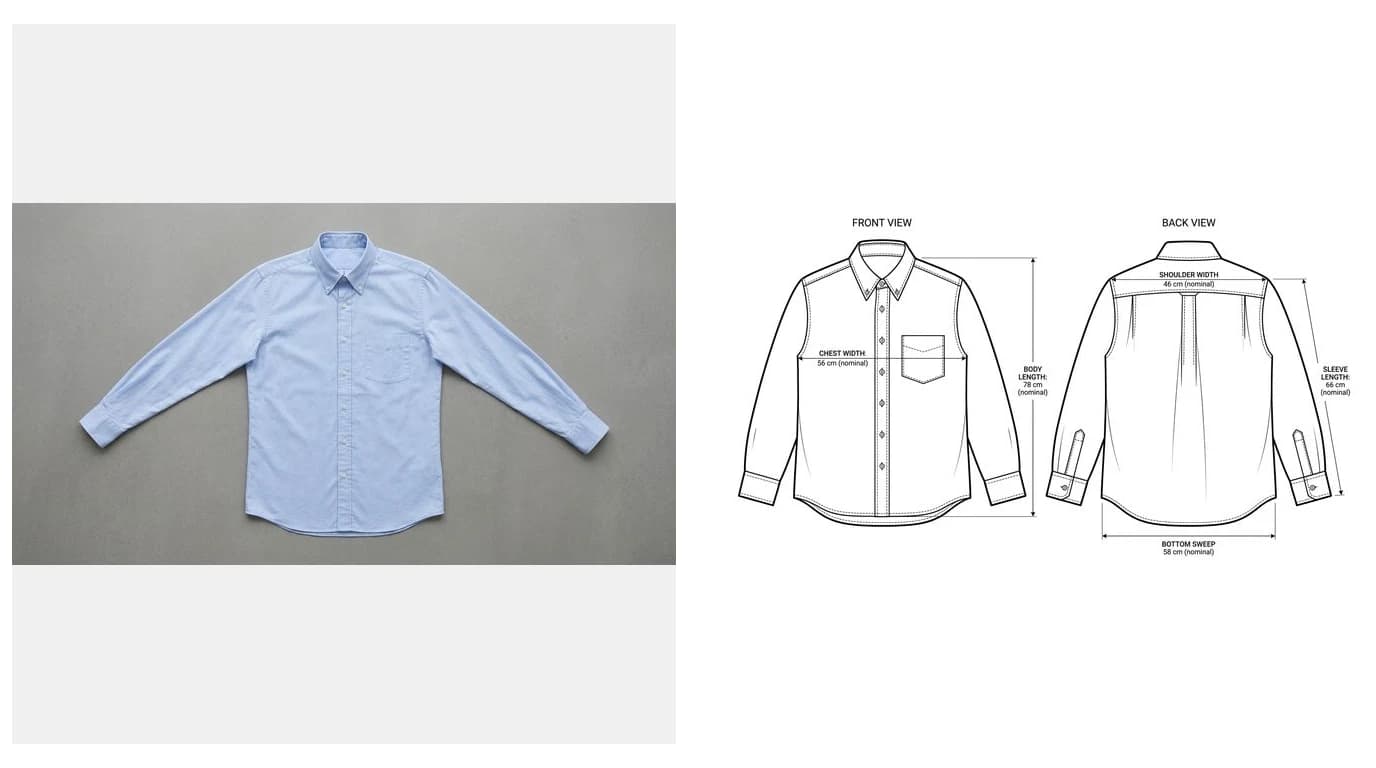
A finished flat carries, at minimum:
- Front and back views, drawn at the same scale and aligned to each other.
- Every construction seam: shoulder, side, armhole, yokes, princess seams, centre back.
- Closures and hardware: buttons and their spacing, zips, snaps, drawcords, eyelets.
- Topstitching, drawn as broken lines so nobody confuses it with a seam.
- Detail or blow-up views for anything a construction question could hang on: a cuff, a placket, a pocket bag, a vent.
Why start from a photo
Most flats are drawn from something that already exists. A first sample, a fit sample with corrections pinned to it, a previous season you are carrying over with one change, or a reference garment you bought to study. The design decision is finished. What is left is transcription, and transcription is the part that eats the afternoon.
The economics of that are worth saying plainly. A designer redrawing a known garment in Illustrator is doing skilled work, but it is not design work. It is the apparel version of what a drafter does when they reverse engineer a part that already sits on the bench. The photo already holds the seam positions, the pocket placement, the button spacing and the proportion of yoke to body. Tracing that by hand adds accuracy only where your eye beats the camera, which is a smaller set of places than most people assume.
Shooting the garment so the flat comes out clean
Almost every bad result traces back to the photograph, not the tool. Five minutes of setup changes the output more than any amount of fiddling afterwards.
- Lay the garment properly flat on a smooth, plain surface that contrasts with the fabric. A white shirt on a white table is the classic way to lose your own hem line.
- Shoot from directly above, centred. Shooting at an angle keystones the garment, so the hem reads narrower than the shoulders and every proportion downstream is wrong. Stand over it and keep the phone parallel to the table.
- Smooth out every wrinkle and set both sleeves at the same angle. Asymmetry in the photo becomes asymmetry you then have to correct in the drawing.
- Shoot the back separately, laid the same way, same height, same lighting. Do not flip the front and hope.
- Take close-ups of anything fiddly: the cuff, the placket, a pocket corner, the hardware. These become your detail views.
- Light it evenly. Soft, flat light from two sides beats a single hard lamp, which throws shadows that read as seams.
Fabric works against you in predictable ways. Black and very dark fabrics swallow seam detail, so light them harder and shoot the detail close-ups on anything you cannot see clearly. Heavy knits and boucle blur seam lines because the surface texture is louder than the construction. Shiny satins and coated fabrics throw specular highlights that a drawing tool will happily interpret as a seam that is not there.
Photo to flat, step by step
- Measure the real garment first, before you upload anything. Flat on the table, tape measure, and write down the points of measure in the next section. This is the step people skip and then wonder why the callouts are wrong.
- Upload the front photo to TechDraw AI for clothes and set your units.
- Enter the measurements you took, so the callouts on the sheet carry your real numbers rather than an estimate scaled from the image.
- Generate the flat and read it against the garment in front of you, not against the photo. The garment is the source of truth.
- Repeat for the back, then for each detail shot you took.
- Export as PDF for the tech pack, or as a vector file if you want to finish it in Illustrator or Inkscape.
Reading it against the physical garment matters more than it sounds. The failure mode of any photo based workflow is that a highlight, a fold or a shadow becomes a line that was never a seam. You catch that in fifteen seconds with the sample in your hand and never catch it by squinting at the screen. The same discipline applies to getting dimensions from a photo in any other field.
Points of measure: what turns a drawing into a spec
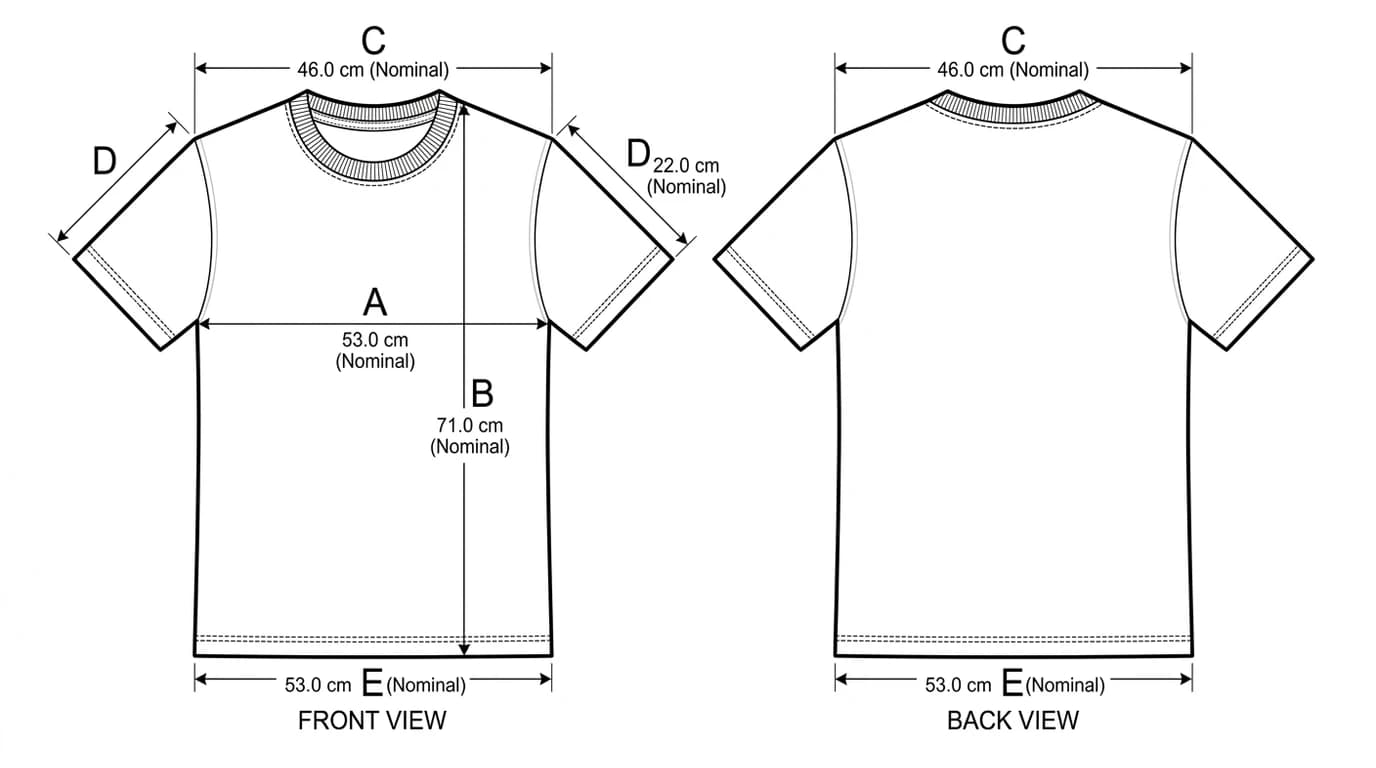
A flat without measurements is a picture. A flat with points of measure is a spec, and points of measure, usually shortened to POM, are the named places on the garment that everyone agrees to measure. The naming matters as much as the number, because “chest” means nothing on its own: measured where, across or around, garment flat or on the body? ASTM D5219 exists precisely to pin that terminology down.
Common points of measure for a woven top, garment laid flat
Two things make a POM list actually useful rather than decorative. First, name your base size and state that the sheet is specified in it. A spec with no base size is a spec nobody can grade from. Second, add a tolerance to every measurement, typically something like plus or minus a quarter inch on a chest and plus or minus half an inch on a length. Fabric relaxes, cutting varies and sewing varies. Without a stated tolerance, either you reject a perfectly good bulk run or your factory quietly decides the tolerance for you.
Drawing the construction detail
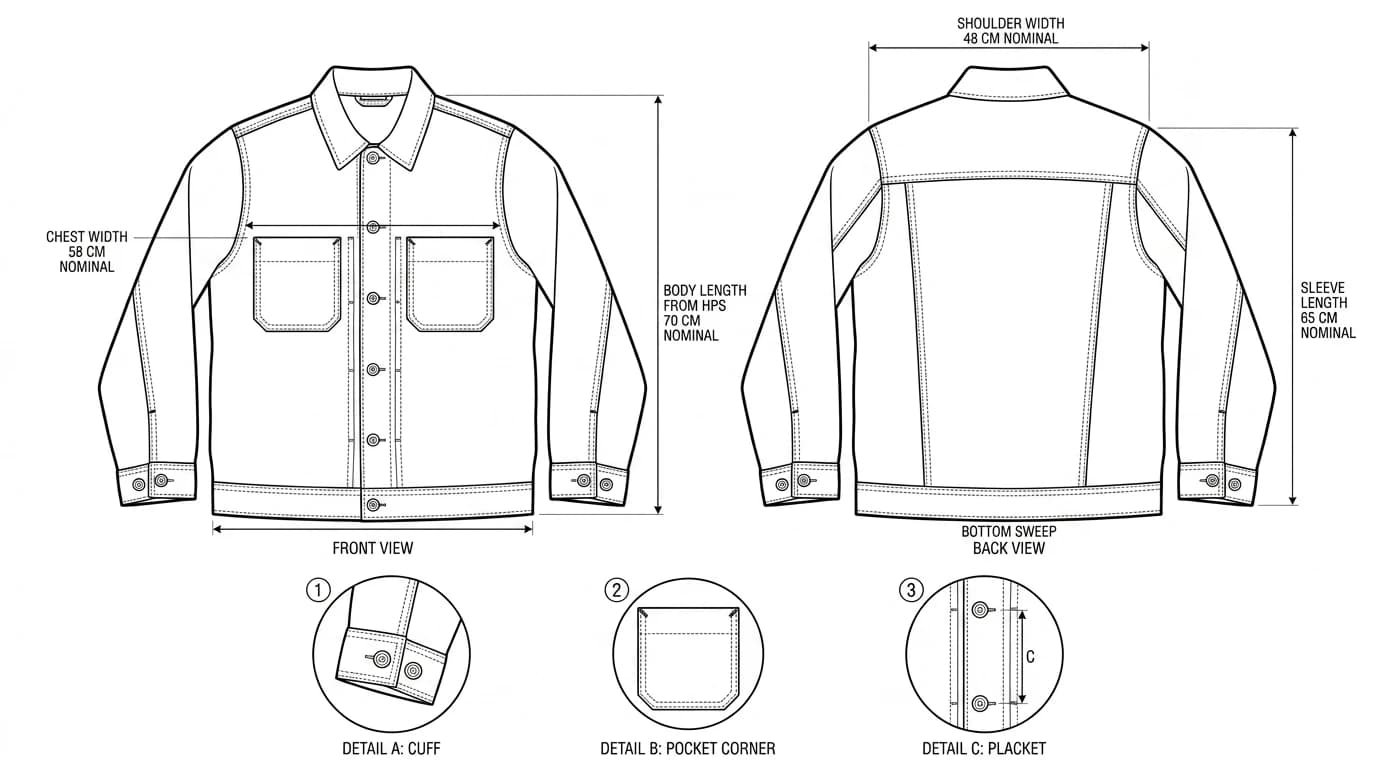
The outline is the easy half. What separates a flat that gets sampled correctly from one that comes back wrong is the construction detail, and there is a small vocabulary factories expect to see.
- Topstitching is drawn as a broken line running parallel to the seam it follows. Single needle is one broken line, double needle is two. Call out the distance from the edge, since 1/16 in and 1/4 in topstitch read as completely different garments.
- Stitch types have numbers. ISO 4915 classifies them, so a 301 is a lockstitch, a 401 a chainstitch and a 504 a three thread overlock. Writing the number removes an entire category of argument.
- Seam types have numbers too, under ISO 4916. A French seam, a flat felled seam and a plain overlocked seam are different products at different prices, and drawing the seam without naming its class leaves the factory to pick the cheapest.
- SPI, stitches per inch, controls how the seam looks and how strong it is. Denim topstitching at 7 SPI and shirt seaming at 12 SPI are both correct, for different garments.
- Hardware gets specified, not just drawn. Button size in ligne, zip type and gauge, drawcord width and tipping. A drawn circle is not a button spec.
Line weights and why factories notice them
Flats use line weight as meaning, in exactly the way an engineering drawing does. The outer silhouette carries the heaviest line. Internal construction seams sit a step lighter. Topstitching is lighter again and broken. Anything hidden, like a pocket bag behind a front panel, is dashed.
Get that hierarchy wrong and the drawing still looks fine to you and reads as mush to the person cutting it. Every line the same weight means the reader has to work out from context which lines are edges and which are stitching, which is precisely the interpretation a flat exists to remove. If you are exporting to vector and finishing by hand, setting up three or four stroke weights as a style once will do more for your tech packs than any amount of redrawing.
What a flat from a photo cannot do
This is where I would rather be blunt than sell you something. There is a hard line between what a photo can and cannot support, and tools that blur it cost people real money.
A photo genuinely gives you:
- Silhouette and proportion, once anchored to one real measurement.
- Seam and panel placement that is visible from outside.
- Closure, pocket and trim positions.
- Visible topstitching and its rough distance from the edge.
It does not give you:
- A sewing pattern. A flat is the outside of the garment. A pattern is the set of 2D pieces cut in fabric, and it depends on seam allowances, ease, grainlines, notches and fabric behaviour that no photograph contains. Pattern making stays with a pattern maker or a system like Gerber, Lectra, Optitex or CLO.
- Grading. Sizes are not a photo problem. They come from grade rules applied to the base size, and they are a decision, not a measurement.
- Absolute size. The same image results from a small garment shot close and a large one shot further back. This is a property of single view imaging, not a limitation of any particular tool, and it is why you measure the garment yourself.
- Anything under a layer. Interlining, a pocket bag inside a facing, a taped seam on the reverse. If it is not visible, it needs a detail view you draw deliberately.
- Fabric and trim specification. Composition, weight in gsm, finish, colour. A photo suggests these. It never proves them.
Everything on the second list belongs in the rest of the tech pack, which is a separate job from drawing the flat. Our guide to building a tech pack covers the sheets that sit around the flats and what each one has to contain.
Checklist before it goes in the tech pack
- Front and back views both present, at the same scale and aligned.
- The drawing is symmetrical left to right unless the garment genuinely is not.
- Every seam visible on the sample appears on the drawing, and every line on the drawing exists on the sample.
- Topstitching is broken line work with its distance from the edge called out.
- Detail views for the cuff, placket, pocket and any closure.
- Points of measure named and numbered, with the base size stated and a tolerance on each.
- Stitch and seam classes called out where the construction could reasonably go two ways.
- The file is legible at print size, not just at 200 percent on your monitor.
Work through that list and the flat stops being a nice drawing and starts being a document that survives a factory reading it. Photograph the garment properly, measure it before you upload, and let TechDraw AI do the transcription while you spend your attention on the details a camera was never going to see.
Frequently asked questions
Can you make a fashion flat from a photo?
Yes. A flat is a straight-on, symmetrical line drawing of a garment, and a straight-on photo of that garment laid flat contains almost everything the drawing needs: silhouette, seam placement, closures, pocket positions and topstitching. What the photo cannot give you is real size, so you enter the key measurements yourself and the callouts are scaled to those. TechDraw AI does this from a single photo of the front and one of the back.
What is the difference between a fashion flat and a fashion illustration?
A fashion illustration is drawn on a stylised figure and sells the mood of a garment. A flat, sometimes called a technical flat or a flat sketch, is drawn as if the garment were laid on a table: no body, no drape, no shading, symmetrical left to right, and proportional to the real measurements. Illustrations go in a lookbook. Flats go in a tech pack, because a factory needs to see every seam and closure without interpretation.
Do I still need Adobe Illustrator for flats?
Not to produce the drawing itself. Illustrator is still the standard for editing vector flats, building a reusable block library and laying out a full tech pack, and most factories accept AI, EPS or PDF. If you want to redraw a curve or move a callout after generating a flat, exporting to a vector format and finishing it in Illustrator or a free alternative like Inkscape is a perfectly normal workflow.
Does a flat sketch need front and back views?
Yes, always. A tech pack without a back view is one of the most common reasons a factory returns a wrong first sample: back yokes, back darts, centre back seams and back pocket placement are simply invisible from the front. Add detail views on top of that for anything a construction question could hang on, such as a cuff, a placket or a pocket bag.
Can AI generate a sewing pattern from a photo?
No, and be careful with any tool that claims it can. A flat is a picture of the outside of the garment. A pattern is the set of 2D pieces cut in fabric, and it depends on fabric behaviour, seam allowances, ease, grainlines, notches and grading rules that no photo contains. What you can automate is the drafting time between a sample and a spec sheet. Pattern making and grading stay with a pattern maker or a CAD system like Gerber, Lectra or CLO.
How accurate are the measurements on a generated flat?
As accurate as the measurements you feed it. A single photo carries no absolute scale, so the drawing is proportional until you anchor it. Measure the real garment flat on a table with a tape, enter the points of measure you care about, and the callouts on the drawing become those exact numbers. Anything you do not measure is an estimate scaled from the ones you did.
Sources
- ISO 4915:1991 Textiles: Stitch types, Classification and terminology
- ISO 4916:1991 Textiles: Seam types, Classification and terminology
- ASTM D5219: Standard Terminology Relating to Body Dimensions for Apparel Sizing
- Single View Metrology in the Wild (ECCV 2020): scale is unrecoverable from one image without a known reference