A beautiful render sells a piece of furniture. A shop drawing builds it. The two are not the same document, and the gap between them is where wrong sizes, weak joints and expensive remakes live. A good furniture shop drawing leaves nothing to interpretation: the bench can cut, joint, assemble and finish the piece without calling you once.
A shop drawing is a build contract, not a picture
It helps to be strict about what a furniture shop drawing actually is. A concept sketch communicates an idea. A 3D render communicates a look. A shop drawing communicates instructions: the exact geometry, materials and steps a workshop follows to produce the piece as intended.
That difference matters because a bench cannot build from intent. It builds from numbers and notes. The same logic applies in metalwork, which is why shops still insist on 2D drawings even when a 3D model exists. A render shows the table looking good. The shop drawing is what guarantees the legs are the same length.
What every furniture shop drawing must include
A complete sheet answers every question the maker could ask before they reach for a tool. Leave one of these out and you have invited a phone call or a wrong cut.
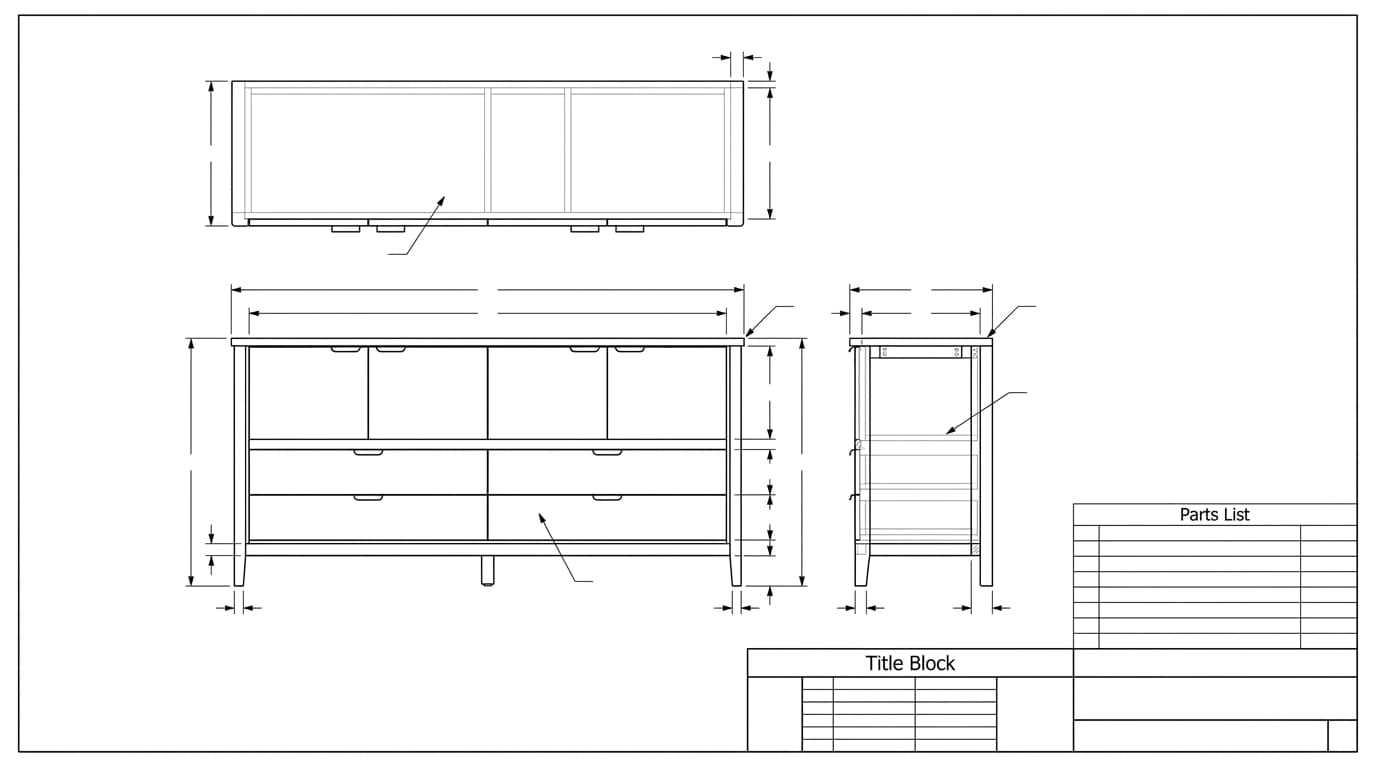
The anatomy of a buildable furniture shop drawing
| Element | Why it matters |
|---|---|
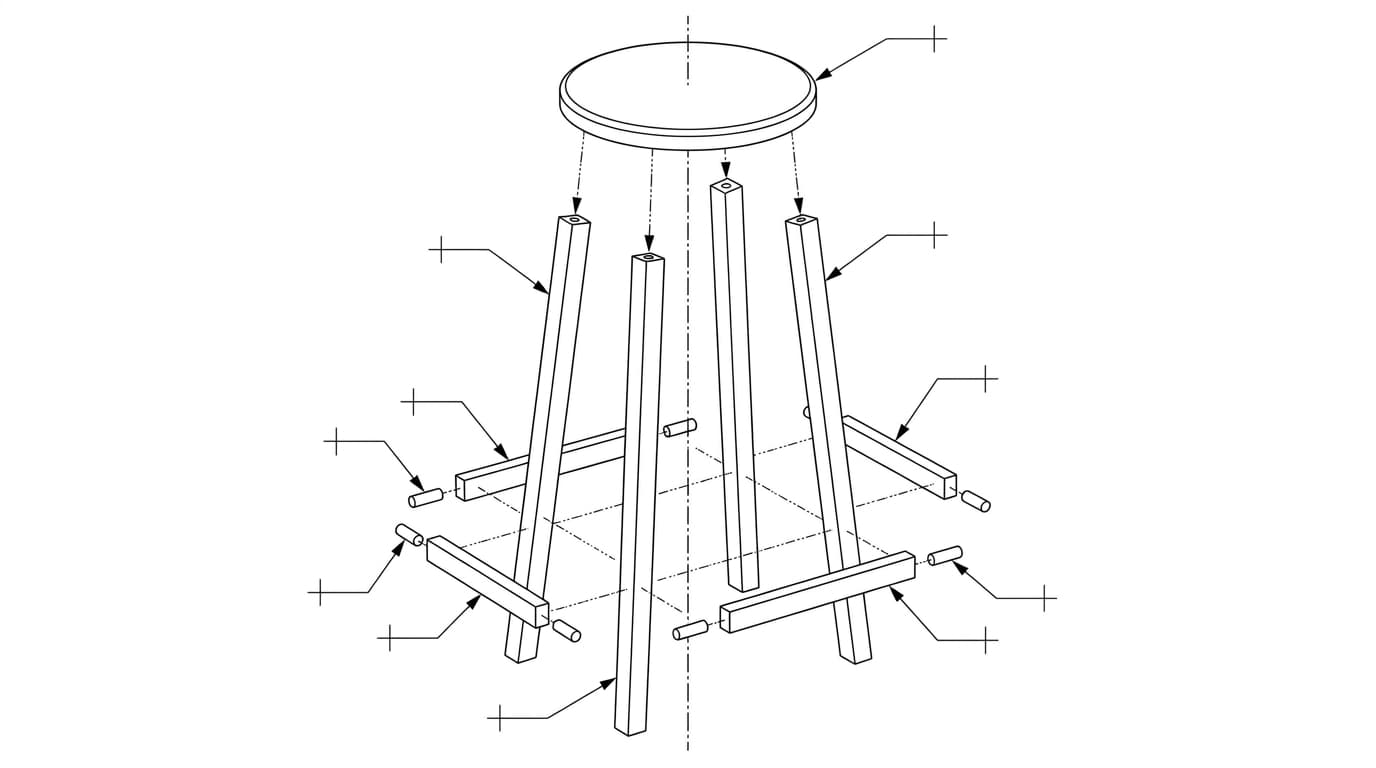
| Multiple views | Front, top and side, plus sections and usually an isometric or exploded view, so every face and internal feature is unambiguous. |
| Every dimension | Overall sizes and every component, located so nothing has to be scaled off the print or calculated. |
| Material and thickness | Species, sheet grade and exact thickness for each part. A 18 mm and a 19 mm panel are different parts. |
| Joinery details | Joint type, size and orientation, with a detail view for anything hidden such as a mortise depth or dado width. |
| Hardware | Hinges, slides, connectors, fasteners: size, model and finish, plus their exact positions. |
| Finish | Stain, paint, lacquer or oil, with sheen and any colour reference, and which faces get it. |
| Grain direction | Marked where it matters, both for strength and for how the piece reads visually. |
| Cut list | The parts table: part name, quantity, material, thickness, width and length, ready for the saw. |
| Title block | Project, piece, revision, units, scale and who drew it, so the right version is on the bench. |
How to make a furniture shop drawing, step by step
The order matters. Working from the whole to the part keeps you from dimensioning details that later move.
- Set the overall form. Lock the outside dimensions and the stance of the piece first: height, width, depth and the key reveals.
- Lay out the views. Front, top and side in orthographic projection, arranged so they read together. Add sections through anything with internal structure.
- Dimension from real references. Measure from the faces that locate the part in the assembly, not from wherever is convenient. The rules are the same as in how to dimension a technical drawing.
- Detail the joints. Pull each joint out into a detail view at a larger scale and dimension it fully.
- Annotate everything else. Materials, hardware, finish, grain and assembly notes go on as callouts.
- Build the cut list. Every part, with quantity and finished sizes, cross-checked against the drawing.
- Verify. Read the sheet as if you were the maker and had never seen the design. Anything you have to assume is a gap.
For the short version of what a cut list actually is and how it differs from the drawing, see what is a cut list.
Joinery and grain are not optional notes
Two things separate furniture drawings from generic part drawings, and both are easy to under-specify.
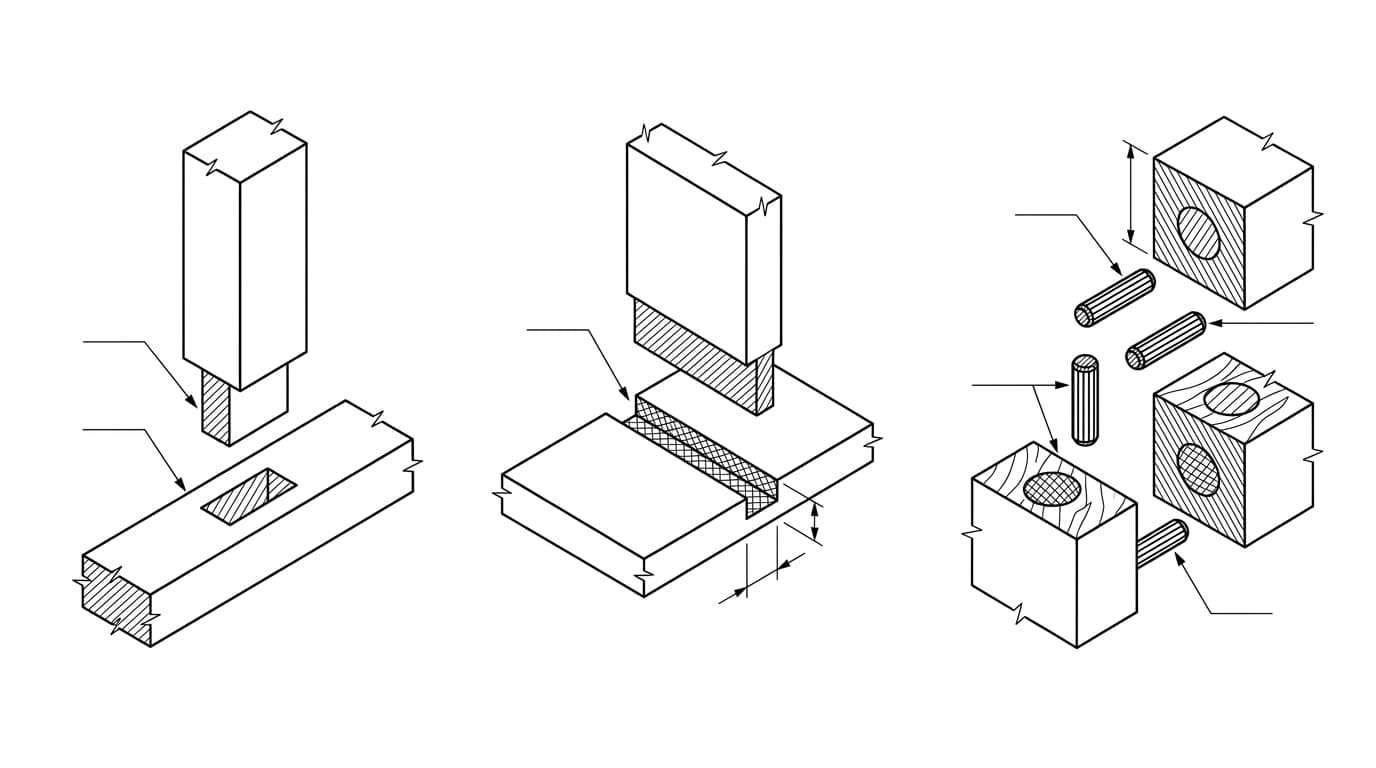
Joinery is usually what decides whether the piece is strong and stays square. A mortise and tenon, a domino, a dowel and a pocket screw produce very different results, so the joint type, its dimensions and its orientation all belong on the drawing. For hidden joints, a section or detail view is not a luxury, it is the only way to communicate a depth or a shoulder.
Grain direction affects strength, movement and appearance. Wood moves across the grain, so a part oriented the wrong way can split a panel or crack a finish over a season. Mark grain where it carries structural or visual weight, and your cut list inherits the right orientation.
The mistakes that quietly cause remakes
- Dimensions that disagree. The same length given two ways, and the two ways do not match. Dimension each feature once.
- Vague joinery. A joint shown but not sized, so the bench guesses a depth and the piece ends up loose or weak.
- Ignoring material reality. Designing for a nominal thickness when the actual sheet is a millimetre off, or a radius tighter than the material will bend.
- No grain callout. Leaving orientation to chance on a part where movement or look depends on it.
- A cut list that drifts from the drawing. Edit one and forget the other, and the saw works from a number the drawing no longer shows.
Each of these has the same root: something on the sheet was left for the maker to interpret. The whole discipline of a shop drawing is to make interpretation unnecessary. That bar is the same one we describe for any manufacturing-ready drawing.
Where AI fits in the workflow
The slow part of a furniture shop drawing has always been the drafting: projecting the views, placing dimensions, keeping the cut list in step with the geometry. That is exactly the part AI is now good at.
With a tool like TechDraw AI you photograph the piece or upload a sketch, the AI lays out the views and the dimension lines, and you set the real measurements so the sheet is to scale. You stay responsible for the decisions only you can make: the joints, the grain, the tolerances that matter. The result exports to the file your shop needs, a DXF for the cutting paths or a PDF drawing for the bench.
This works just as well when you do not have the piece in hand at all, only a photo of one you want to build: see reverse-engineering a furniture shop drawing from a photo for measuring a piece you don't own, inferring hidden joinery, and the wood-movement adjustments a copy needs.
If you prefer to draft by hand, or in free tools like SketchUp with the OpenCutList extension or Fusion 360 for hobbyists, the same checklist applies: the tool changes, the requirements do not. And if you are new to reading these sheets at all, start with how to read a technical drawing and the rest will make more sense.
The quick checklist
Before a furniture shop drawing leaves your hands:
- Front, top, side, the sections you need, and an exploded or isometric view.
- Every part located and sized, and none of them dimensioned twice.
- Material, thickness and grain marked for each component.
- Every joint detailed and dimensioned, hidden ones in a section.
- Hardware called out with size, model, finish and position.
- Finish specified, including sheen and which faces get it.
- A cut list that matches the drawing exactly.
- A title block with the piece, revision, units and scale.
Tick all of those and you have handed the workshop a document they can build from on the first try, which is the entire point of drawing it.
Frequently asked questions
What is a furniture shop drawing?
A furniture shop drawing is a detailed technical drawing that tells a workshop exactly how to build a piece: every view, dimension, material, joint, piece of hardware and finish, plus a cut list and assembly notes. It is the build document, not a marketing render or a concept sketch.
What should a furniture shop drawing include?
Multiple views (front, top, side, sections and usually an isometric or exploded view), every dimension, material type and thickness, joinery details, hardware specifications, finish, grain direction, a cut list and a title block. Anything the maker would otherwise have to guess belongs on the sheet.
What is the difference between a shop drawing and a cut list?
The shop drawing shows how the piece goes together and how every part is sized and located. The cut list is the parts table that goes with it: each component with its quantity, material, thickness, width and length. You need both, and they have to agree.
Do I need CAD to make furniture shop drawings?
Not necessarily. A clear hand drawing with correct views, dimensions, joinery and a cut list can be perfectly buildable. CAD makes revisions, scaling and a clean cut list much easier, and AI tools can now turn a photo or sketch into dimensioned views automatically.
How detailed should joinery be on a shop drawing?
Detailed enough that the joint is not left to interpretation. Show the joint type, its dimensions and orientation, and call out a section or detail view for anything hidden, such as a mortise depth or a dado width. The joinery is usually what decides whether the piece is strong and square.
Sources
- Fine Woodworking: The illustrated cut list, why a sketch belongs with the parts table
- Woodcraft: A pro's guide to making a cut list, joinery allowances and relative dimensioning
- AWI: Architectural Woodwork Standards (AWS), shop drawing requirements
- WoodBin: Bill of materials and cut list for woodworking projects
- ISO 128: Technical product documentation, general principles of presentation