You saw a chair in a showroom, a sideboard at a client's house, or a sofa in a photo you saved months ago, and now you want to build your own version. There is no drawing, no cut list, and often no chance to put a tape measure on the actual piece. This is the workflow for turning that one photo into a shop drawing you can actually build from, and for being honest about the parts a photo can't tell you.
Why you're doing this without the plans
Furniture shop drawings almost always assume you have the piece in front of you, or at least the original design files. Reverse engineering furniture from a photo is a different problem: the source is a picture, and the piece itself may belong to someone else, sit behind a rope in a showroom, or simply not exist anymore. Our complete guide to furniture shop drawings covers what a finished sheet needs to contain. This is about getting there when a photo is all you have.
What a photo gives you, and what it can't
A single photograph is an honest source for some things and a poor one for others, and knowing the split up front saves you from overtrusting the picture.
A clear, square-on photo reliably gives you:
- Overall proportions: how tall relative to wide, how the legs taper, where the stretcher sits relative to the seat.
- Visible joinery style: whether a joint reads as a mortise and tenon, a dowel, a bracket, or a mechanical fastener.
- Form details: profile of a leg, curve of an arm, panel layout on a door or drawer front.
What it cannot give you on its own:
- Absolute size. The same photo results from a small piece shot close up and a large piece shot from further back. This is the same physics that makes a photo of any object dimensionless without a reference, covered in image to CAD.
- Hidden joinery. What's inside an apron or under a seat is invisible from outside, no matter how sharp the photo.
- Wood species and moisture content. Color and grain in a photo are clues, not proof, and finish and lighting change how a species reads.
Measuring a piece you don't own
The trick that makes this whole workflow possible is the same one that makes any photo measurable: anchor the picture to one thing in frame with a known, standard size, then scale everything else against it.
Standard references worth scaling against
| Reference in the photo | Typical size (US) |
|---|---|
| Interior door height | 80 in / 203 cm |
| Standard chair seat height | 17–18 in / 43–46 cm |
| Standard dining table height | 29–30 in / 74–76 cm |
| Electrical outlet, bottom edge | 12 in / 30 cm from the floor |
| Light switch, center | 48 in / 122 cm from the floor |
| A person of known height, standing beside the piece | their actual height |
Pick whichever reference actually appears in your photo, measure it in pixels against the piece you're copying, and use that ratio to convert every other dimension you read off the image. This will not be caliper-accurate, and it doesn't need to be: round the result to a sensible shop dimension, and treat the number as a strong starting point you confirm once you have a prototype part or a mockup in hand.

Reading joinery you can't see
Hidden joinery is where reverse engineering furniture differs most from reverse engineering a metal part: a bracket's fastener holes are usually visible, but a chair's leg-to-seat joint almost never is. The practical fix is to infer from style, era and load, not to guess blindly.
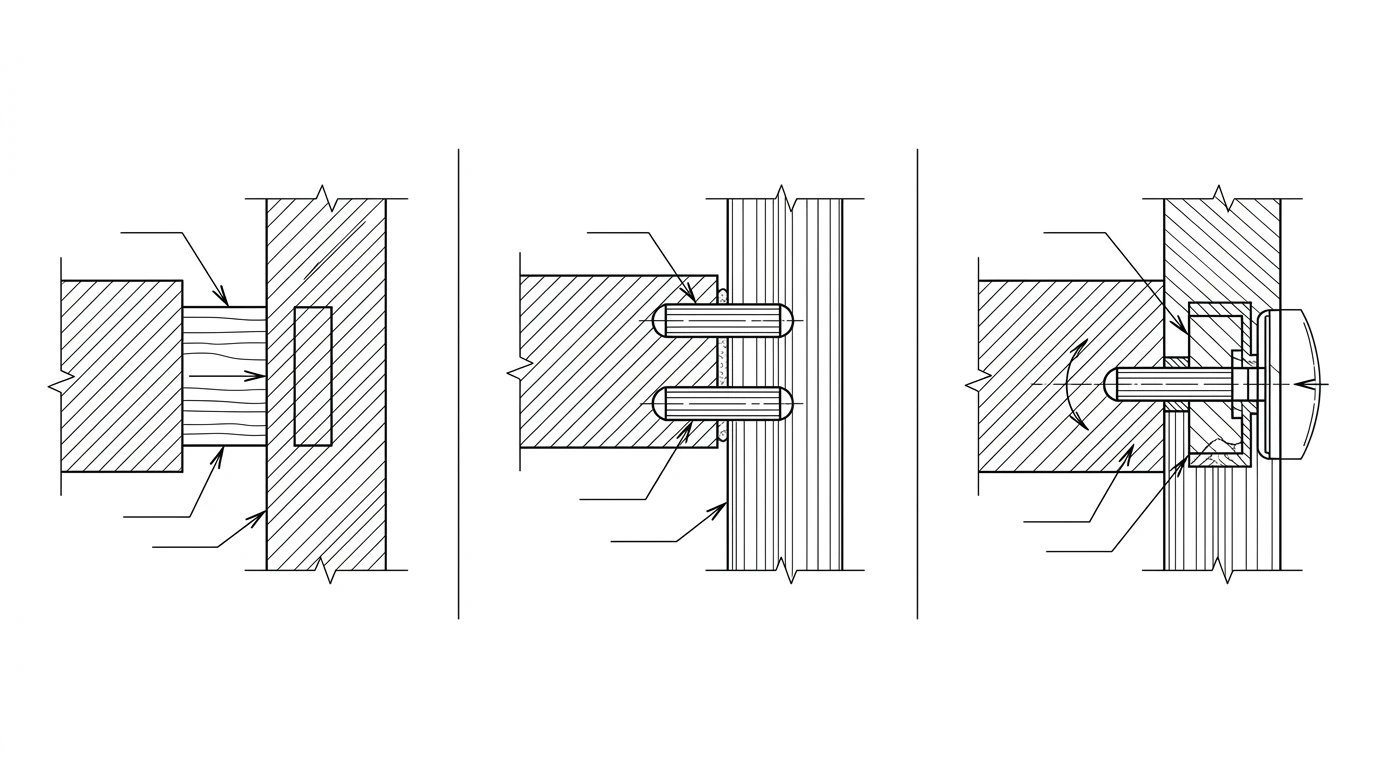
- Traditional and Windsor-style pieces at a leg-to-apron or leg-to-seat junction are very often a mortise and tenon, sometimes a wedged or through-tenon on chairs built for heavy use.
- Mid-century and Scandinavian pieces lean on precisely fit dowel joints, often paired with a mechanical fastener at structural points.
- Flat-pack and modern production furniture is almost always cam-and-dowel connectors or pocket screws, chosen for assembly speed rather than strength or looks.
Once you have a reasonable guess at the style, the honest move is to design the joint to do the same job with a construction you can actually cut, rather than chase an exact replica of a joint you cannot see. A copy doesn't need to be forensically identical inside; it needs to hold the same loads the same way for as long as the original has. For guidance on specifying whichever joint you choose clearly enough to build from, see the joinery section of the furniture shop drawings guide.
Wood movement: the one thing a copy has to respect
This is the step a metal or plastic reverse-engineering job never has to think about, and it matters more here than in an original design, because you are frequently changing at least one variable from the piece you're copying: a different species, a wider panel, or a grain orientation you couldn't confirm from the photo.
Wood expands and contracts across the grain as humidity changes, while it barely moves along the grain at all. A wide panel built without room to move, in a breadboard end or a frame, can crack a finish or split outright within a season, regardless of how accurate the rest of your drawing is. If the original piece is decades old, it has already gone through this cycle repeatedly and settled; your fresh copy in a possibly different species has not, so give panels room to move and avoid gluing cross-grain construction rigidly on anything wider than a few inches.
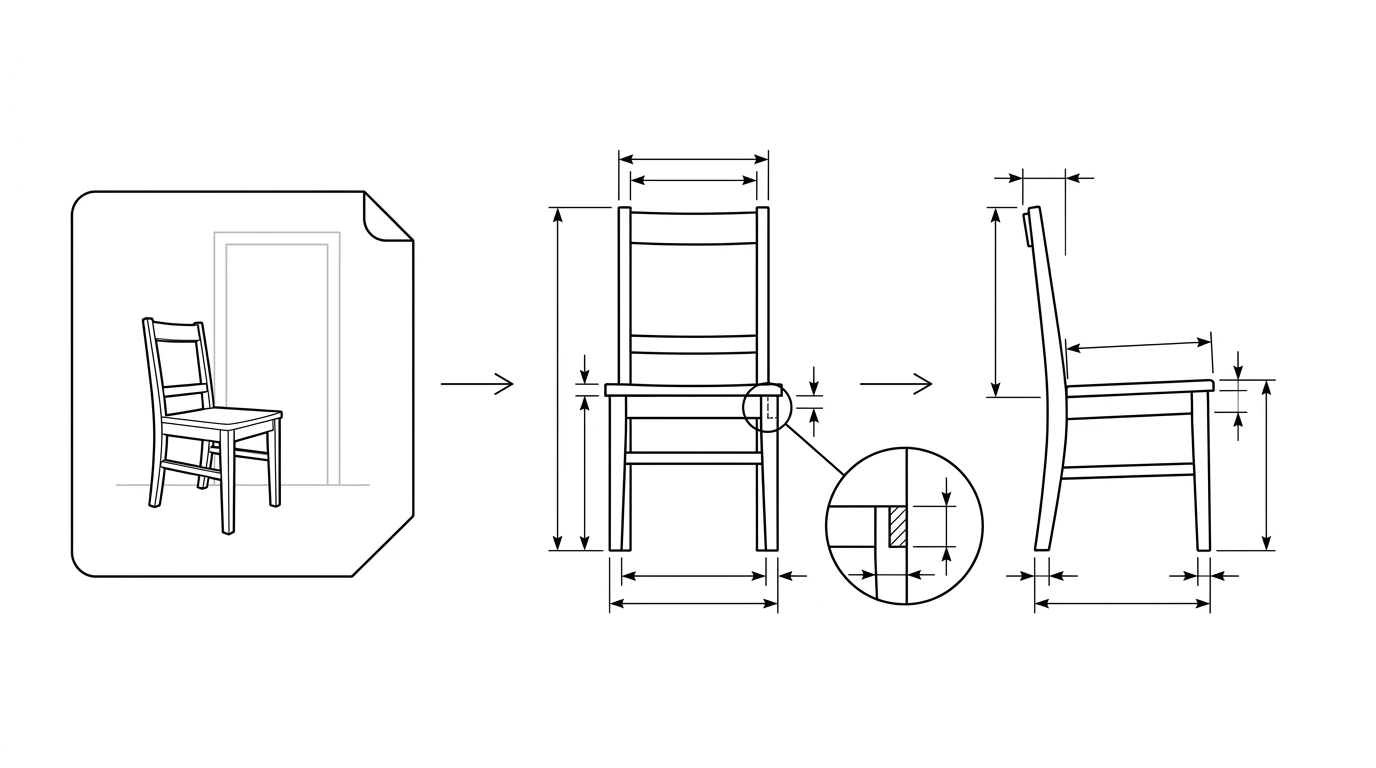
Photo to shop drawing, step by step
- Collect every photo you can. Multiple angles beat one perfect shot: front, three-quarter, and any detail shot of a joint, foot, or hardware.
- Identify a scale reference already in one of the photos, from the table above, or capture a new photo with your own hand or a known object in frame if you get the chance.
- Generate the dimensioned views. Upload the clearest photo to TechDraw AI, set your reference measurement, and get front, top and side views scaled to it.
- Add the joinery you inferred as its own detail view, sized to a joint you can actually cut, following the reasoning above.
- Note the material: your chosen species, thickness, and the movement allowance it needs, even where the original's species is a best guess.
- Build the cut list from the finished drawing, the same way you would for an original design.
Copying vs. adapting on purpose
Rebuilding from a photo rarely means matching every dimension exactly, and it usually shouldn't. You may be working with a different sheet size, a taller family member, or simply a different room. Adapt deliberately rather than let the drawing drift:
- Scale proportionally where the look depends on ratios: leg taper, apron height relative to the seat, the reveal around a drawer front.
- Hold human-factor dimensions steady even when everything else scales: seat height, table height and armrest height should stay close to standard ergonomic ranges, not stretch or shrink with the rest of the piece.
- Re-check joinery sizing if you change material thickness. A tenon sized for 3/4 inch stock does not simply scale to 1 inch stock without changing proportions of its own.
Checklist before you cut
- Every dimension traces back to a real reference, not an assumed one.
- Each joint is specified as something you can build, not a forensic guess at what's hidden inside the original.
- Material and thickness are decided, with a movement allowance for that species, not the guessed original.
- Human-factor dimensions (seat, table and armrest heights) sit in a standard, comfortable range.
- The cut list matches the drawing, the same discipline as any other shop drawing.
- If you intend to sell copies, you've considered whether the piece is a named designer's specific work rather than a general style.
Tick those off and the drawing stops being a guess dressed up as a plan. Start with the clearest photo you have and TechDraw AI to get the dimensioned views, then apply the judgment above to the parts a photo was never going to hand you.
Frequently asked questions
Can you make a furniture shop drawing from just a photo?
Yes, for the overall form, proportions and visible joinery. A single photo gives you shape, not size, so you still need at least one known real-world measurement to scale the drawing correctly. Hidden joinery and interior construction have to be estimated from visual cues and typical practice, or confirmed if you can inspect the piece in person.
How do I get accurate measurements from a photo without touching the piece?
Anchor the photo to something in frame with a known, standard size: a doorway (commonly 80 inches / 203 cm tall in the US), a standard chair seat height (around 18 inches / 46 cm), an outlet or light switch height, or a person of known height standing nearby. Measure that reference in the photo, then scale every other dimension against it. It won't be caliper-precise, but it's accurate enough to build from once you round to sensible shop dimensions.
How do I figure out joinery I can't see in a photo?
Match the visible style and era of the piece to its typical construction: a traditional joint at a leg-to-apron connection is usually a mortise and tenon, a mid-century piece often uses dowels, and flat-pack furniture is almost always cams and dowels or pocket screws. When you genuinely can't tell, design in the strongest appropriate joint for the load rather than guessing at something decorative but weak, since your copy doesn't have to replicate a hidden joint exactly, only perform the same job.
Is it okay to copy a furniture design from a photo?
For personal, non-commercial use, building your own version of a general style, such as a Windsor chair or a mid-century sideboard, is normal practice and not something copyright reaches. The US Copyright Office treats furniture as a 'useful article,' where copyright protects only separable decorative or artistic elements, not the underlying functional shape. That said, do not sell copies of a named designer's specific piece, since that can raise trademark or design-patent issues in a way personal use does not. If you're building to sell, it's worth checking the specific design's status.
Do I need to know the original wood species to reverse-engineer a piece?
Not to draw it, but you need to pick a species before you build, because wood movement and joinery allowances depend on it. If you can't identify the original from the photo (grain pattern and color are reasonable clues but not certain), choose a species suited to the piece's use and build to that species' movement figures rather than guessing at the original's.
What if my rebuilt piece needs different dimensions than the original?
That's normal, and it's a deliberate adaptation, not an error. Scale proportionally where the design's look depends on ratios, such as leg taper or apron height relative to the seat, and keep human-factor dimensions (seat height, table height, armrest height) close to standard ergonomic ranges rather than scaling those linearly with the rest of the piece.
Sources
- Single View Metrology in the Wild (ECCV 2020) — scale is unrecoverable from one image without a known reference
- USDA Forest Products Laboratory: Wood Handbook — Wood as an Engineering Material (dimensional change with moisture)
- U.S. Copyright Office, Circular 40: Copyright Registration for Works of the Visual Arts (useful articles)
- Fine Woodworking: The illustrated cut list, why a sketch belongs with the parts table