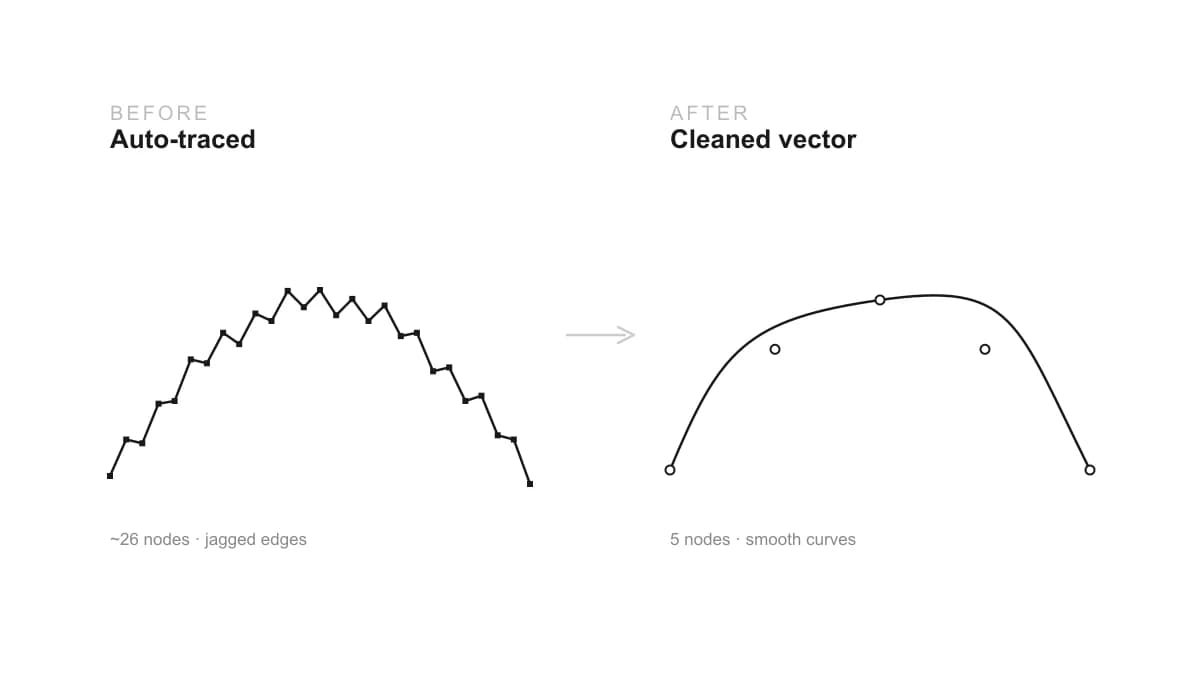
You drop an image into a tracer, hit convert, and the vector comes back rough: zig-zag edges, curves built from a thousand tiny segments, and a file so dense your laser or CNC software chokes on it. Auto-tracing is supposed to save time, not create a cleanup job. The good news is that messy traces have a few predictable causes, and each one has a fix.
Why traces come out messy
A raster image, a PNG, JPG or photo, stores a picture as a grid of pixels. A vector stores geometry: a few points and the smooth curves between them. When you trace, the software has to guess where the edges are and lay paths along them. The problem is that a raster edge is never perfectly clean: it has anti-aliasing, JPEG compression noise, and pixel-level steps. The tracer faithfully follows every one of those wobbles, so a curve that should need 8 points comes back with 800. That density is what you see as jaggedness, and it is what bloats the file.
So a clean trace is really two jobs: give the tracer less noise to follow, and reduce what it produces afterwards. The rest of this guide is those two jobs, in order.
1. Start from a better source
The single biggest lever is the image you feed in. Before tracing:
- Use the highest-quality version you have. A small, blurry image traces into rough edges no setting can rescue. Find the original or the largest copy.
- Maximise contrast. The tracer keys off the boundary between dark and light. Push the image to crisp black on white so that boundary is unmistakable.
- Prefer PNG over JPG for line art. JPG adds compression noise around hard edges, and the tracer reads that noise as geometry. A clean PNG traces sharper.
- Strip the background and clutter. Anything left in the image, texture, a drop shadow, a frame, becomes paths. Remove it so only the shape remains.
2. Get the trace settings right
Every tracer exposes a few controls that decide how much detail it keeps. The names differ, the ideas do not:
- Threshold. Sets where dark becomes light. Tune it until the outline is crisp and complete without filling in or breaking up.
- Detail or smoothing. Lower detail or higher smoothing tells the tracer to ignore tiny wobbles and lay calmer curves. This is the main jaggedness control.
- Speckle or noise suppression. Drops tiny stray spots so they do not become little islands of geometry.
Our free image to DXF converter exposes the trace tuning in the browser so you can watch the outline tighten as you adjust it, then download clean DXF polylines. Get the threshold and smoothing right here and there is far less to clean up later.
3. Simplify the nodes
Even a good trace leaves more points than you need. Simplifying collapses redundant nodes into smooth curves, and it is the highest-impact cleanup step:
- Use the simplify command. In Inkscape it is
Path → Simplify; Illustrator and most editors have an equivalent. Apply it gently and watch the path, too much rounds off detail you want. - Delete stray nodes by hand. With the node tool, remove leftover points on straight runs and tight clusters the simplify pass missed.
- Aim for the fewest nodes that hold the shape. A circle needs four, not forty. Fewer, well-placed points give smoother paths and smaller files.
4. Smooth curves and straighten lines
Tracing turns everything into freeform paths, including things that should be perfectly straight or round. Tidy those by hand:
- Straighten edges that should be straight. A traced straight line is often slightly wavy. Make it a true straight segment.
- Rebuild true circles and arcs. A traced circle is a many-sided blob. Replace it with a real circle or arc so it cuts smooth.
- Smooth the remaining curves. Convert jerky corners to smooth nodes where the shape is meant to flow.
This is also where you decide whether a feature is worth saving. If a part of the logo or shape is geometric, it is often faster to redraw it than to coax a smooth curve out of a trace.
5. Close paths and remove duplicates
Last, make the geometry machine-ready, the same rules as any cut file:
- Close every loop you will cut or fill. Open paths cut as single strokes, not shapes. Join endpoints that should meet.
- Remove duplicate and overlapping lines. They make the tool cut or engrave the same path twice.
- Convert any text to outlines. So letters become geometry rather than relying on a font.
For the full set of file rules a cutter expects, including units and layers, see how to prepare a DXF for laser cutting, and if the cleaned file imports at the wrong scale, that is a separate problem covered in fixing a DXF that imports at the wrong size.
When to stop tracing and redraw
Tracing is not always the answer. The honest rule:
- Trace when the artwork is complex or organic, a detailed logo, an illustration, a hand sketch, and clean enough to follow. Cleaning up a trace beats drawing all that by hand.
- Redraw when the shape is simple and geometric, a bracket, a circle, a rectangular panel. Drawing the geometry directly, in any CAD tool, gives perfect, minimal paths in less time than de-noising a trace.
Most real jobs are a mix: trace the intricate parts, redraw the geometric ones. Knowing which is which is what separates a clean file from an hour of node-wrangling. For turning a rough drawing into geometry from scratch, see turning a sketch into a CNC-ready DXF, and for the logo-specific workflow, converting a logo to a vector for laser engraving.
The clean-vector checklist
- Best source: highest quality, high contrast, PNG for line art, background removed.
- Tune the trace: threshold crisp, detail down or smoothing up, speckles suppressed.
- Simplify nodes: fewest points that hold the shape.
- Smooth and straighten: real circles, true straight lines, flowing curves.
- Machine-ready: closed loops, no duplicates, text outlined.
Run that and the trace that came in as a jagged mess goes out as a clean, smooth vector that cuts and engraves the way it should.
Frequently asked questions
Why is my traced image so jagged?
Because a raster image stores far more raw detail than a vector needs. When you auto-trace it, the tracer follows every pixel-level wobble and compression artifact, so a curve that should have a handful of points ends up with hundreds, and the result looks jagged. The fix is a cleaner source and simplifying the nodes after tracing.
How do I reduce the number of nodes after tracing?
Most vector editors have a simplify command, such as Path then Simplify in Inkscape, which collapses redundant points into smooth curves. You can also lower the detail or increase the smoothing in the trace settings before you trace, and manually delete leftover stray nodes. Fewer, well-placed nodes give smoother paths and faster, cleaner cuts.
Why do too many nodes matter for laser or CNC cutting?
Extra nodes make the toolpath jerky. On a laser, the head slows or pauses at each point, which can leave burn marks and uneven edges; on a CNC router, it makes the cut rougher and slower. A clean path with smooth curves cuts faster and looks better, so reducing nodes is worth the minute it takes.
Will a higher resolution image trace more cleanly?
Up to a point. A sharp, high-contrast image traces far better than a small, blurry one, so resolution helps when the source is genuinely detailed. But a huge image of a noisy, low-contrast logo still traces badly. Contrast and clean edges matter more than raw pixel count.
Is it better to trace or to redraw by hand?
Trace when the artwork is complex or organic and good enough to follow, such as a detailed logo or a sketch. Redraw when the shape is simple and geometric, a circle, a rectangle, a bracket, because drawing those directly gives perfect, minimal geometry faster than cleaning up a trace ever will.